Available 24/7
Email Geoiptvreseller@gmail.com Telegram! @GEOResellers
Are you interested in becoming the IPTV Reseller? If so then you first need to learn how IPTV Reseller Panel works and how you can use it for the first time.
This is a beginners guide where you will learn everything about our panel and how does it work. Whether you are an existing reseller or even a beginner this guide will probably help you a lot.
For quick access, I am putting the table of contents to easily navigate to the guide you want to learn. So, without wasting any further time let’s dig into this guide.
A reseller panel is a dashboard that is provided by an IPTV service whose service you are interested in selling. This panel allows full control over your customers without the interfered with by the parent seller.
In short, you became the owner of that service and therefore you can add users, generate trials, lock their ISP (by default it is unlocked), edit your customer’s bouquets, kill connections and so on.
Despite that, you get the option of Apps IPTV from where you will get the link for the website of Net IPTV, Duplex IPTV, Smart IPTV, NanoMid, Mega IPTV.
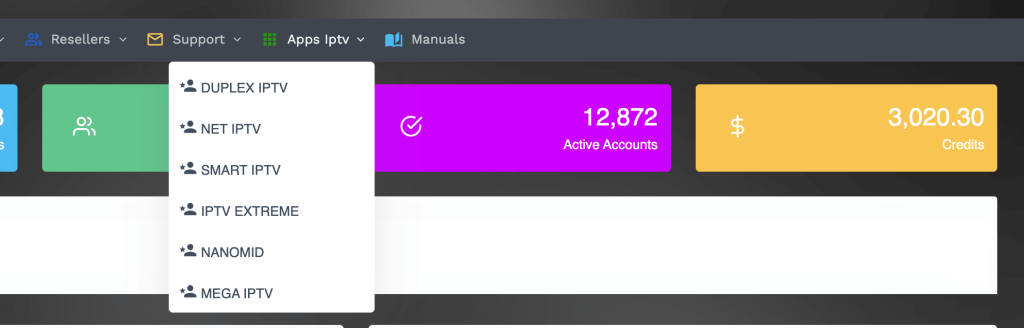
With this, you can directly put the MAC address and upload the M3U playlist of your customers to their applications just in case if they face any problem during setup.
Using IPTV is a lot easier than you think because all you need to have is the Portal URL of the panel and of course the credentials to log in to the panel.
To get the Portal URL and the credentials for the panel you probably need to sign up for our IPTV Reseller service by following this link: Become IPTV Reseller
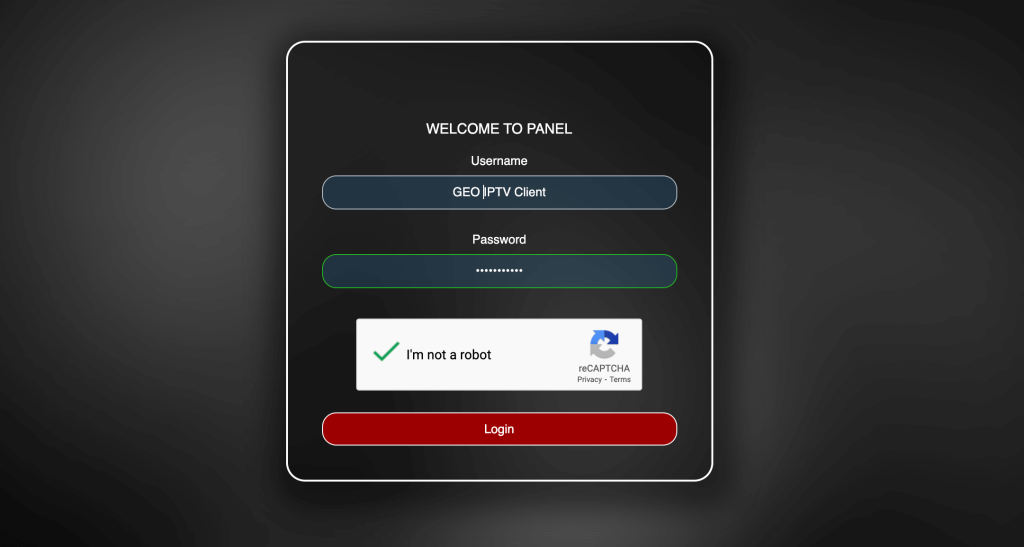
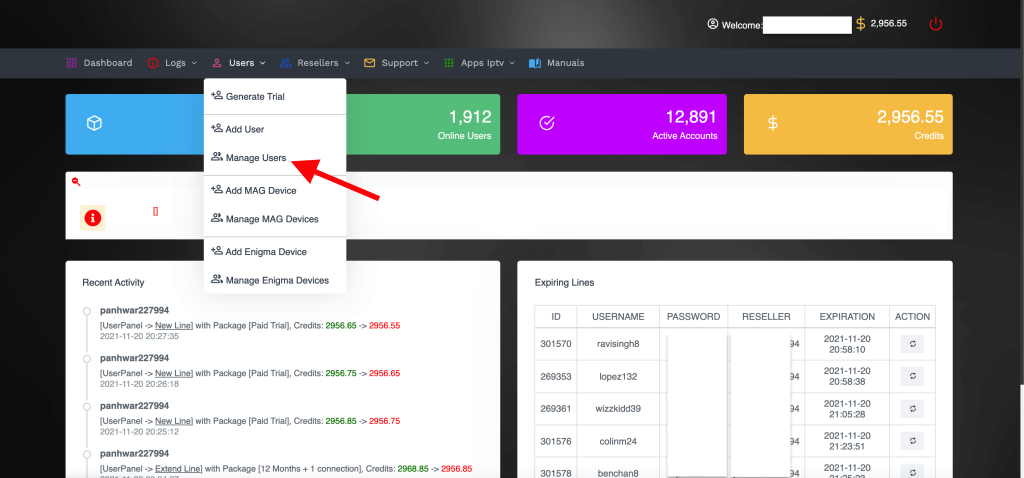
Once you are logged into the panel you will see the dashboard like this:
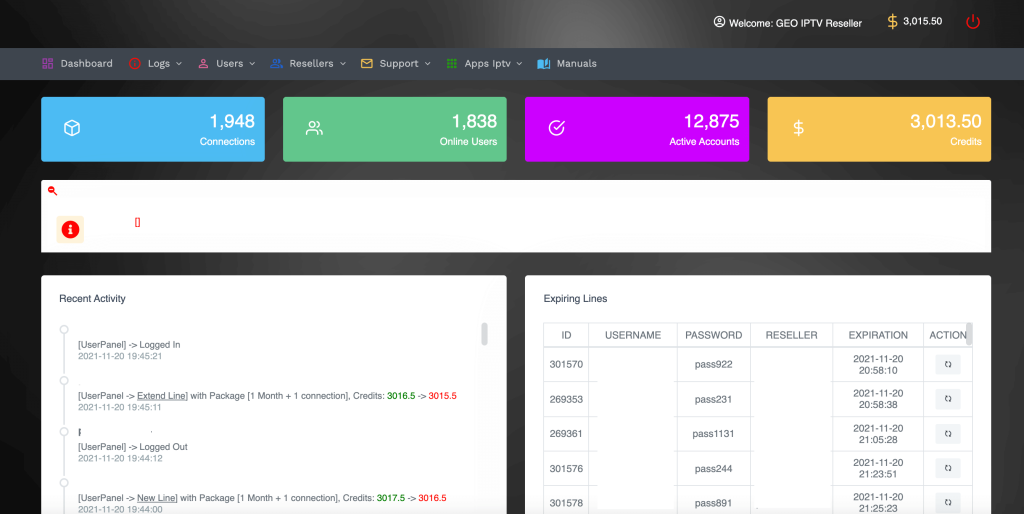
After you log into the panel then on the above right corner you will see the number of credits you have. Make sure to check you get the right number of credits that you pay for as if the credits are zero then you cannot create any new account.
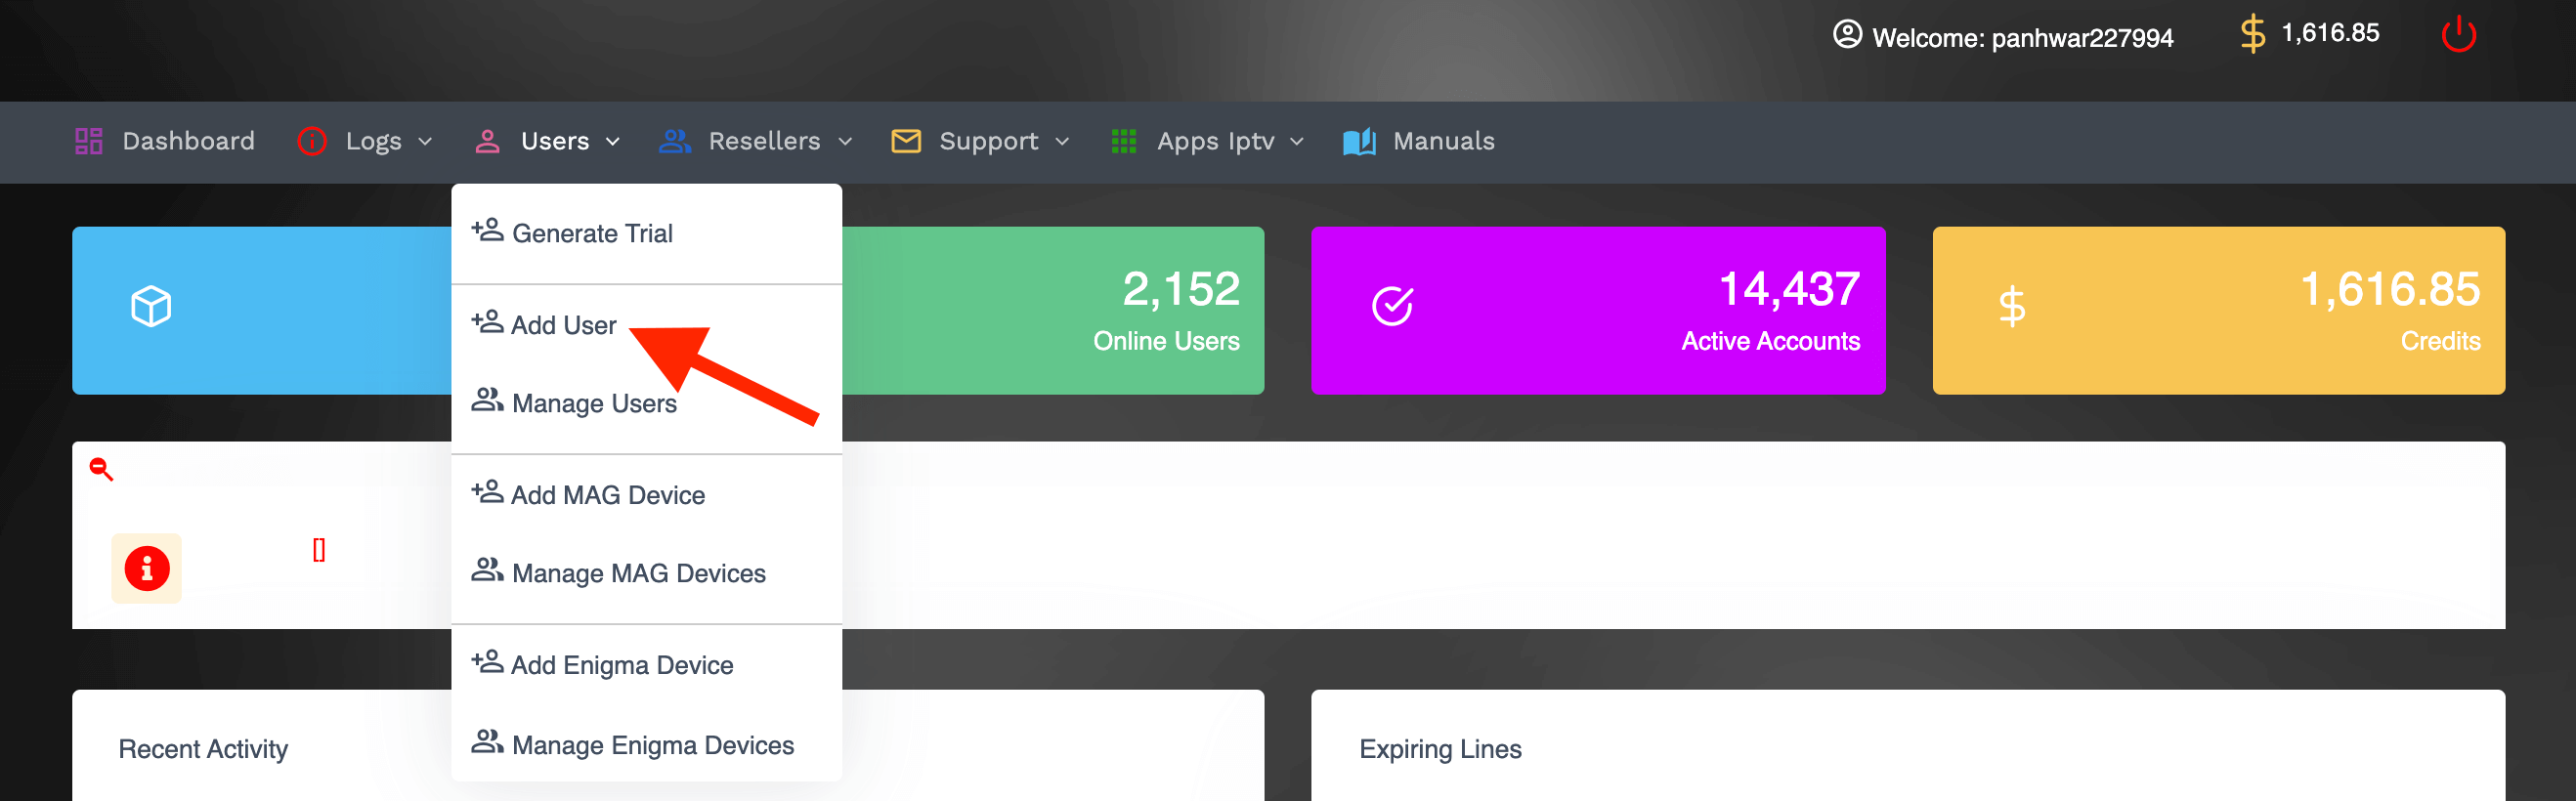
Okay so here are the steps to create the customer’s account:
Hover to the Users menu that is available in the above Panel and then clicks Add User.

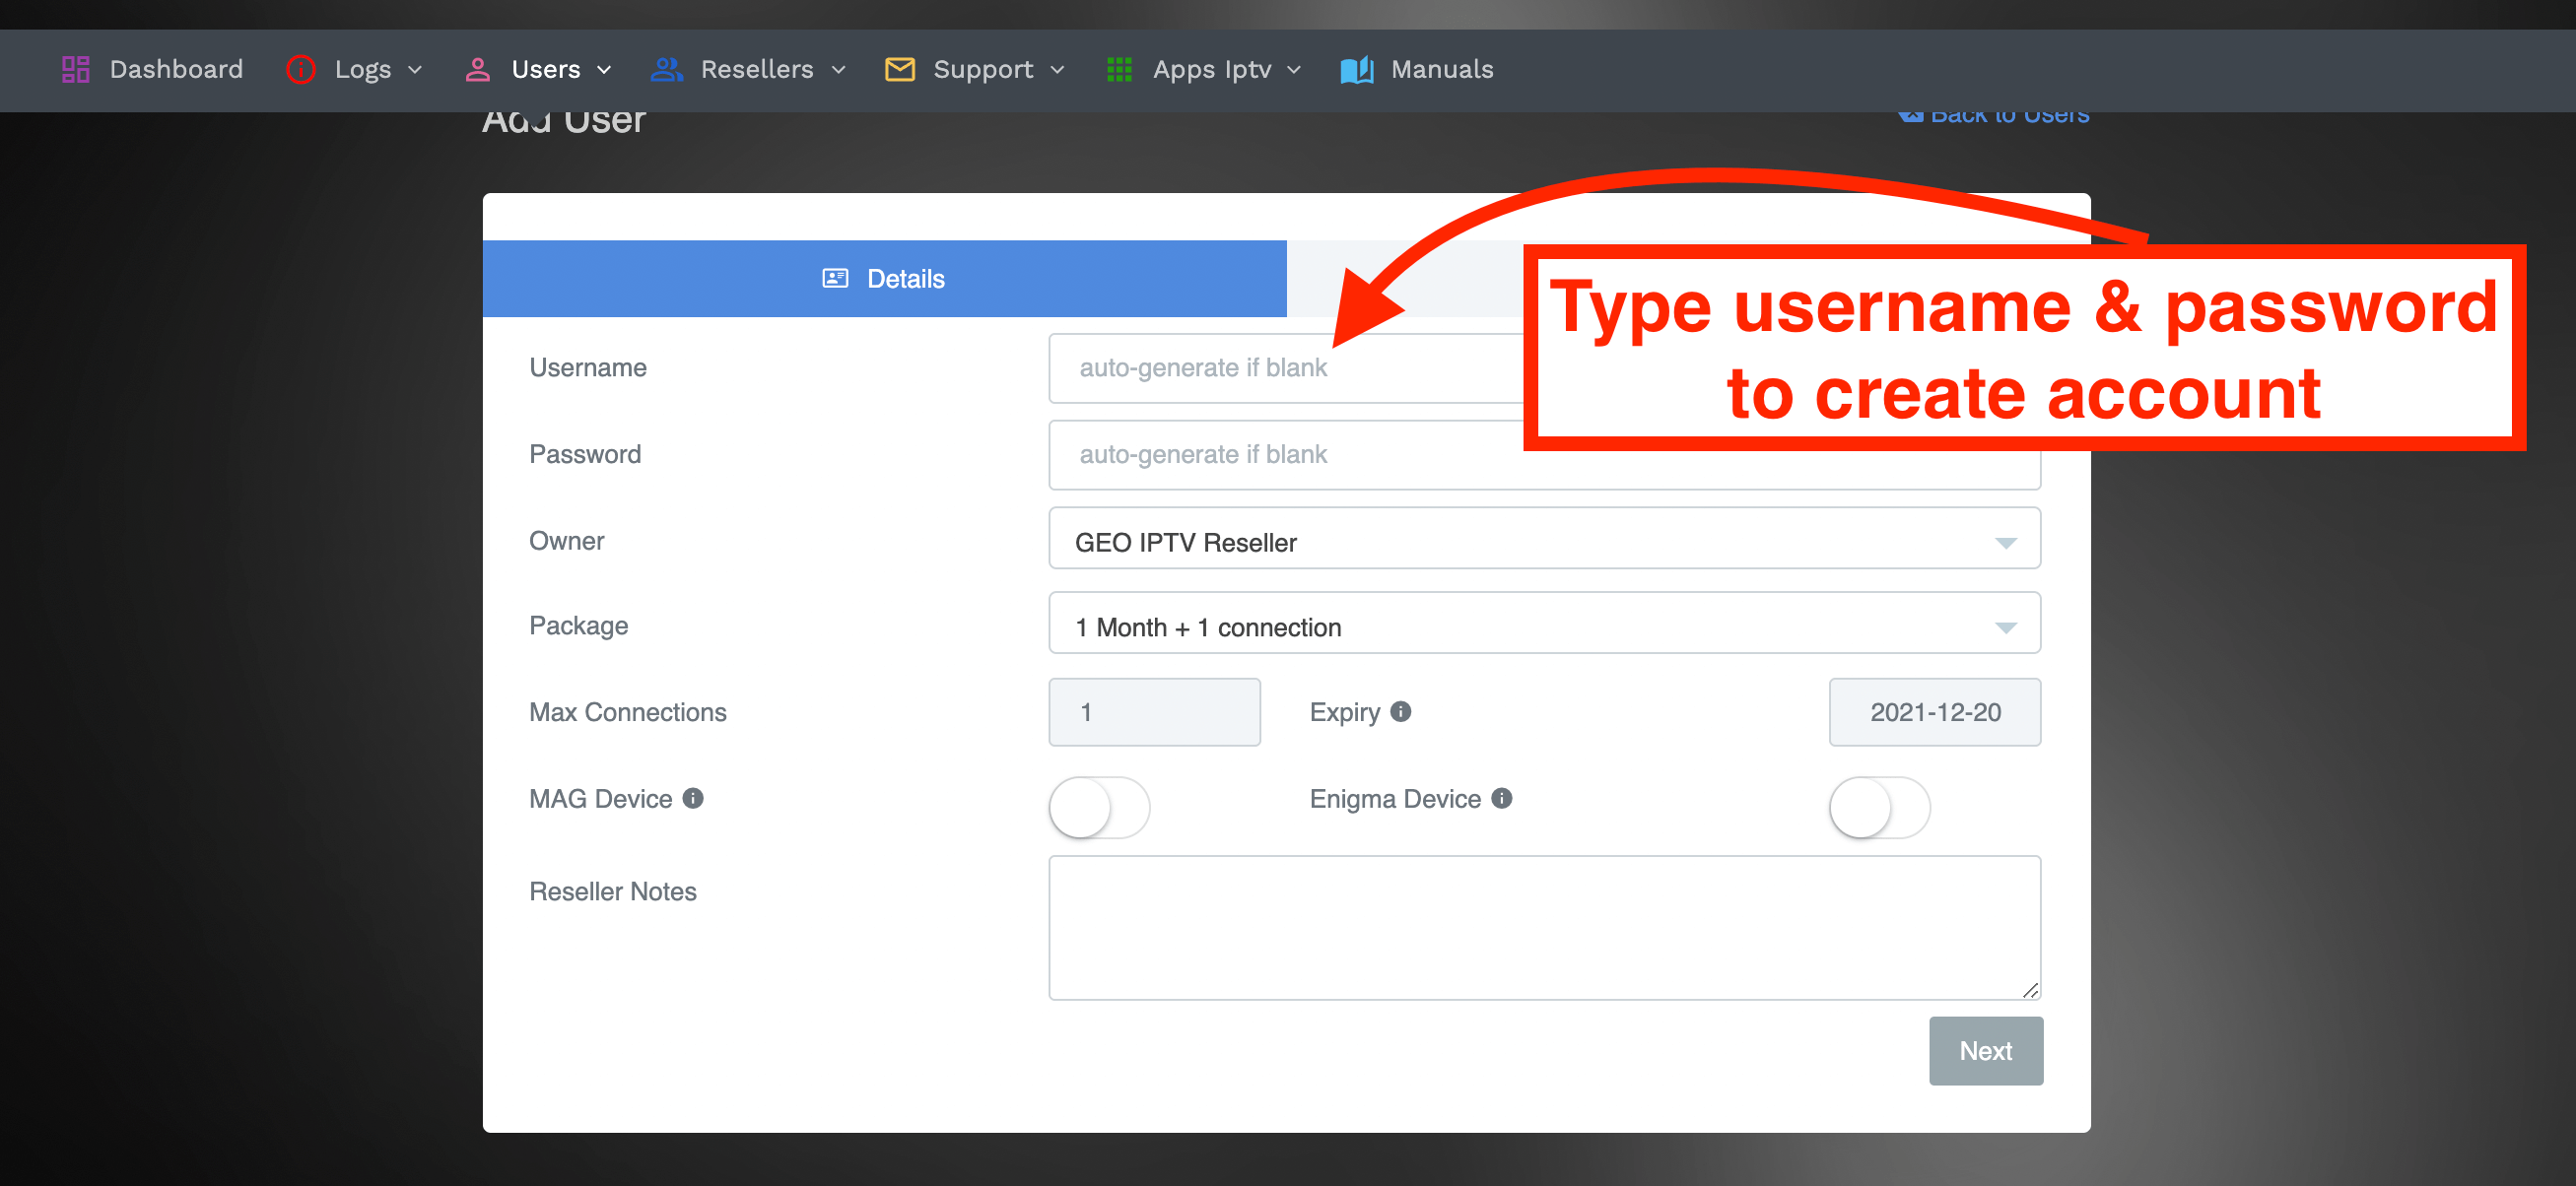
From the next screen you need to type the Username and the Password for your User.
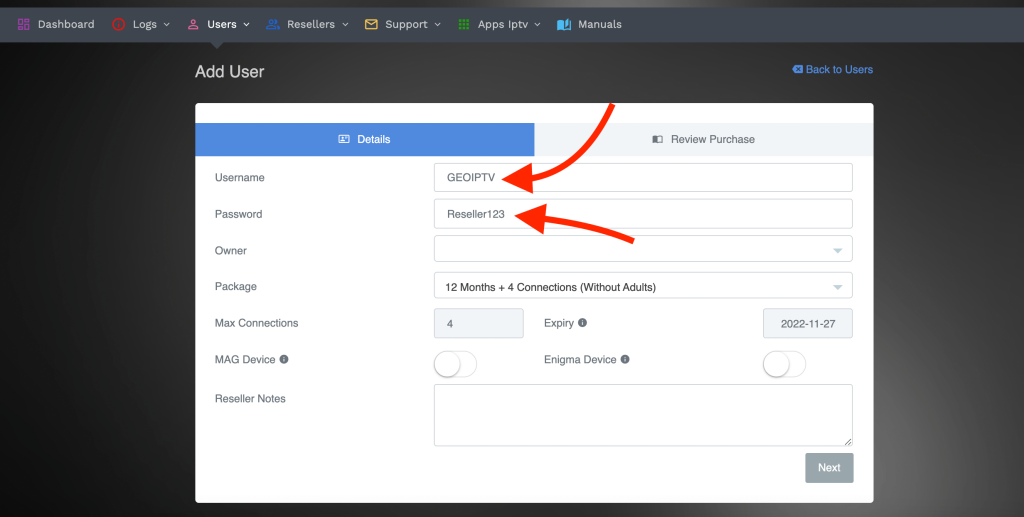
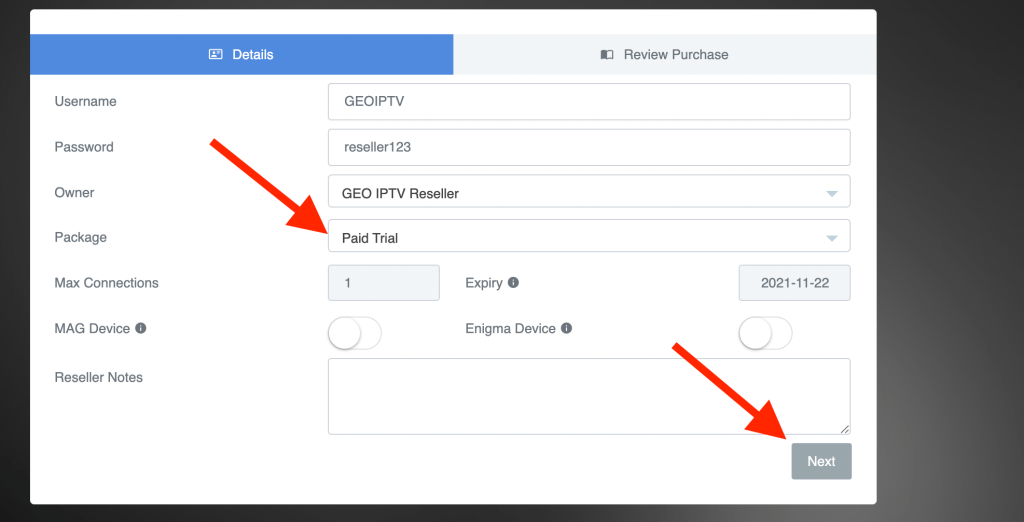
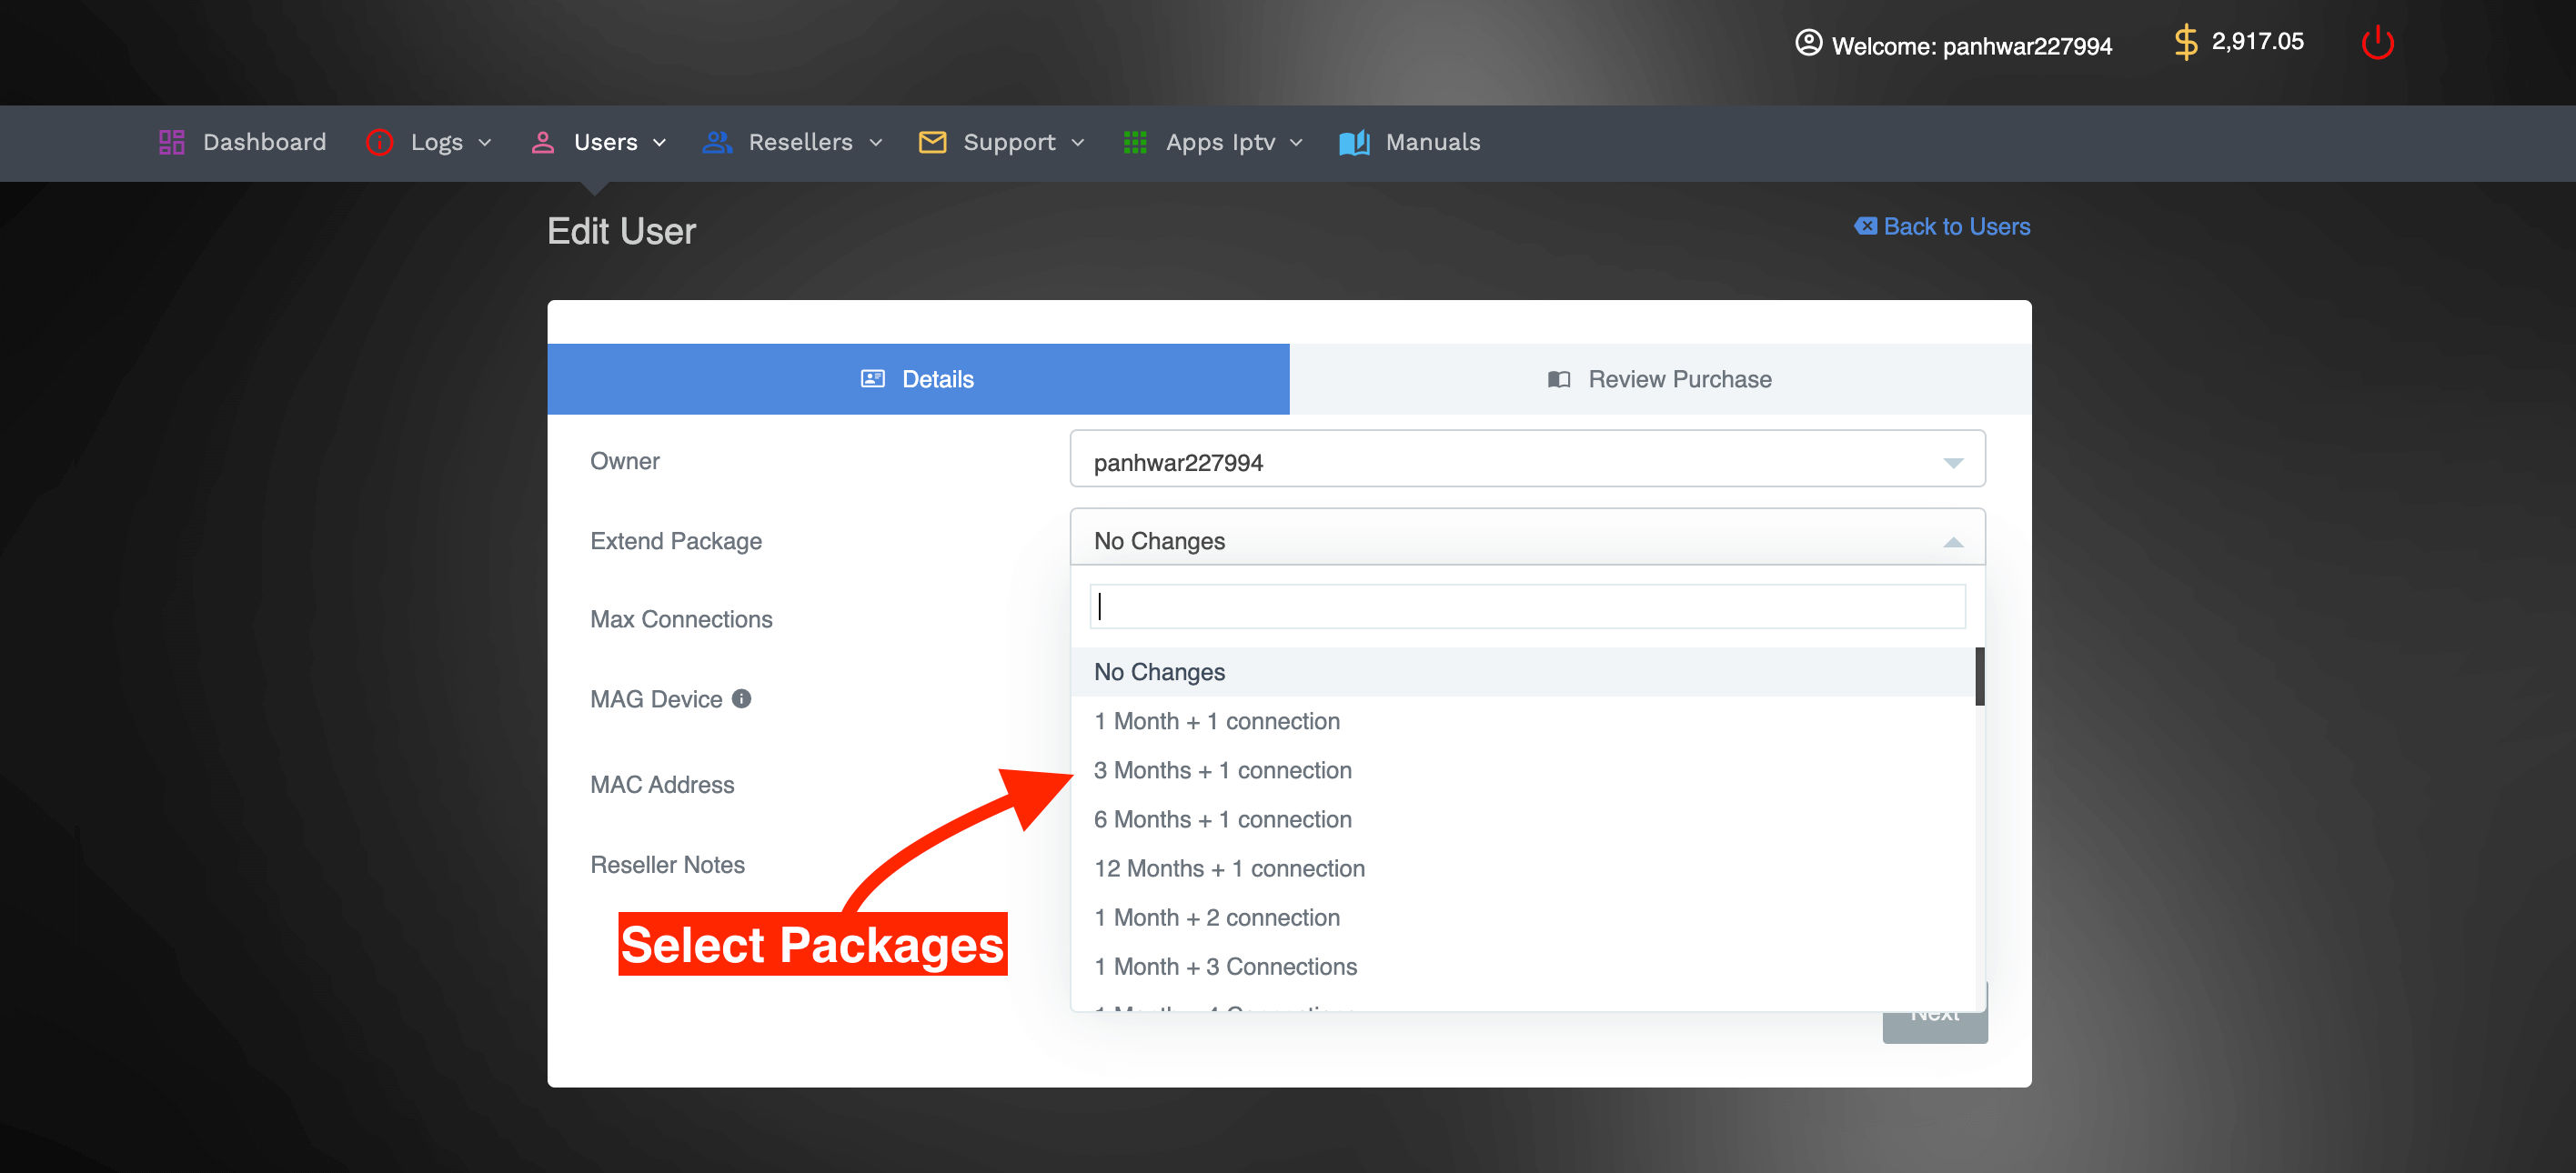
After that move to the Package section where you can choose the Plan for your customer.
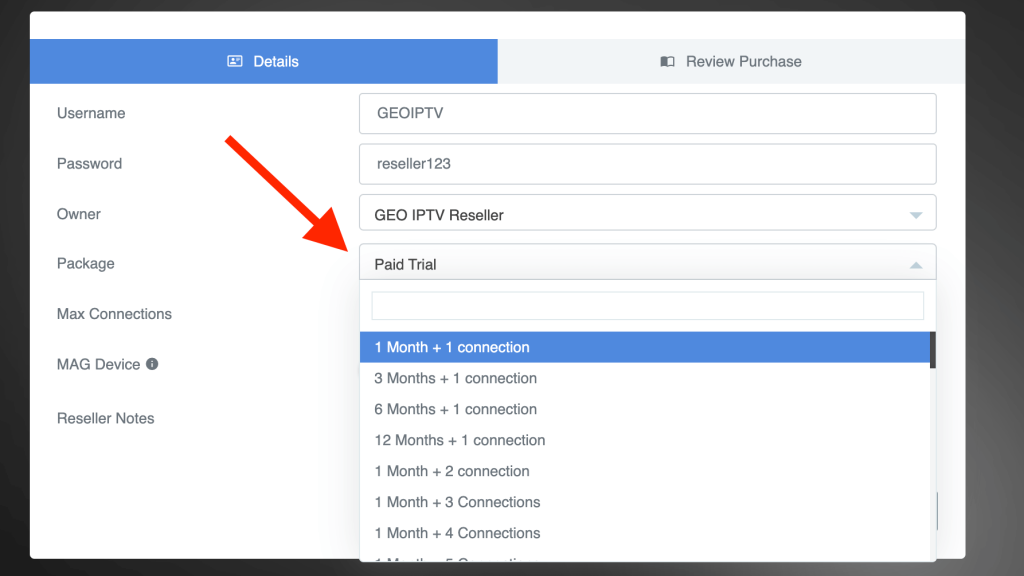
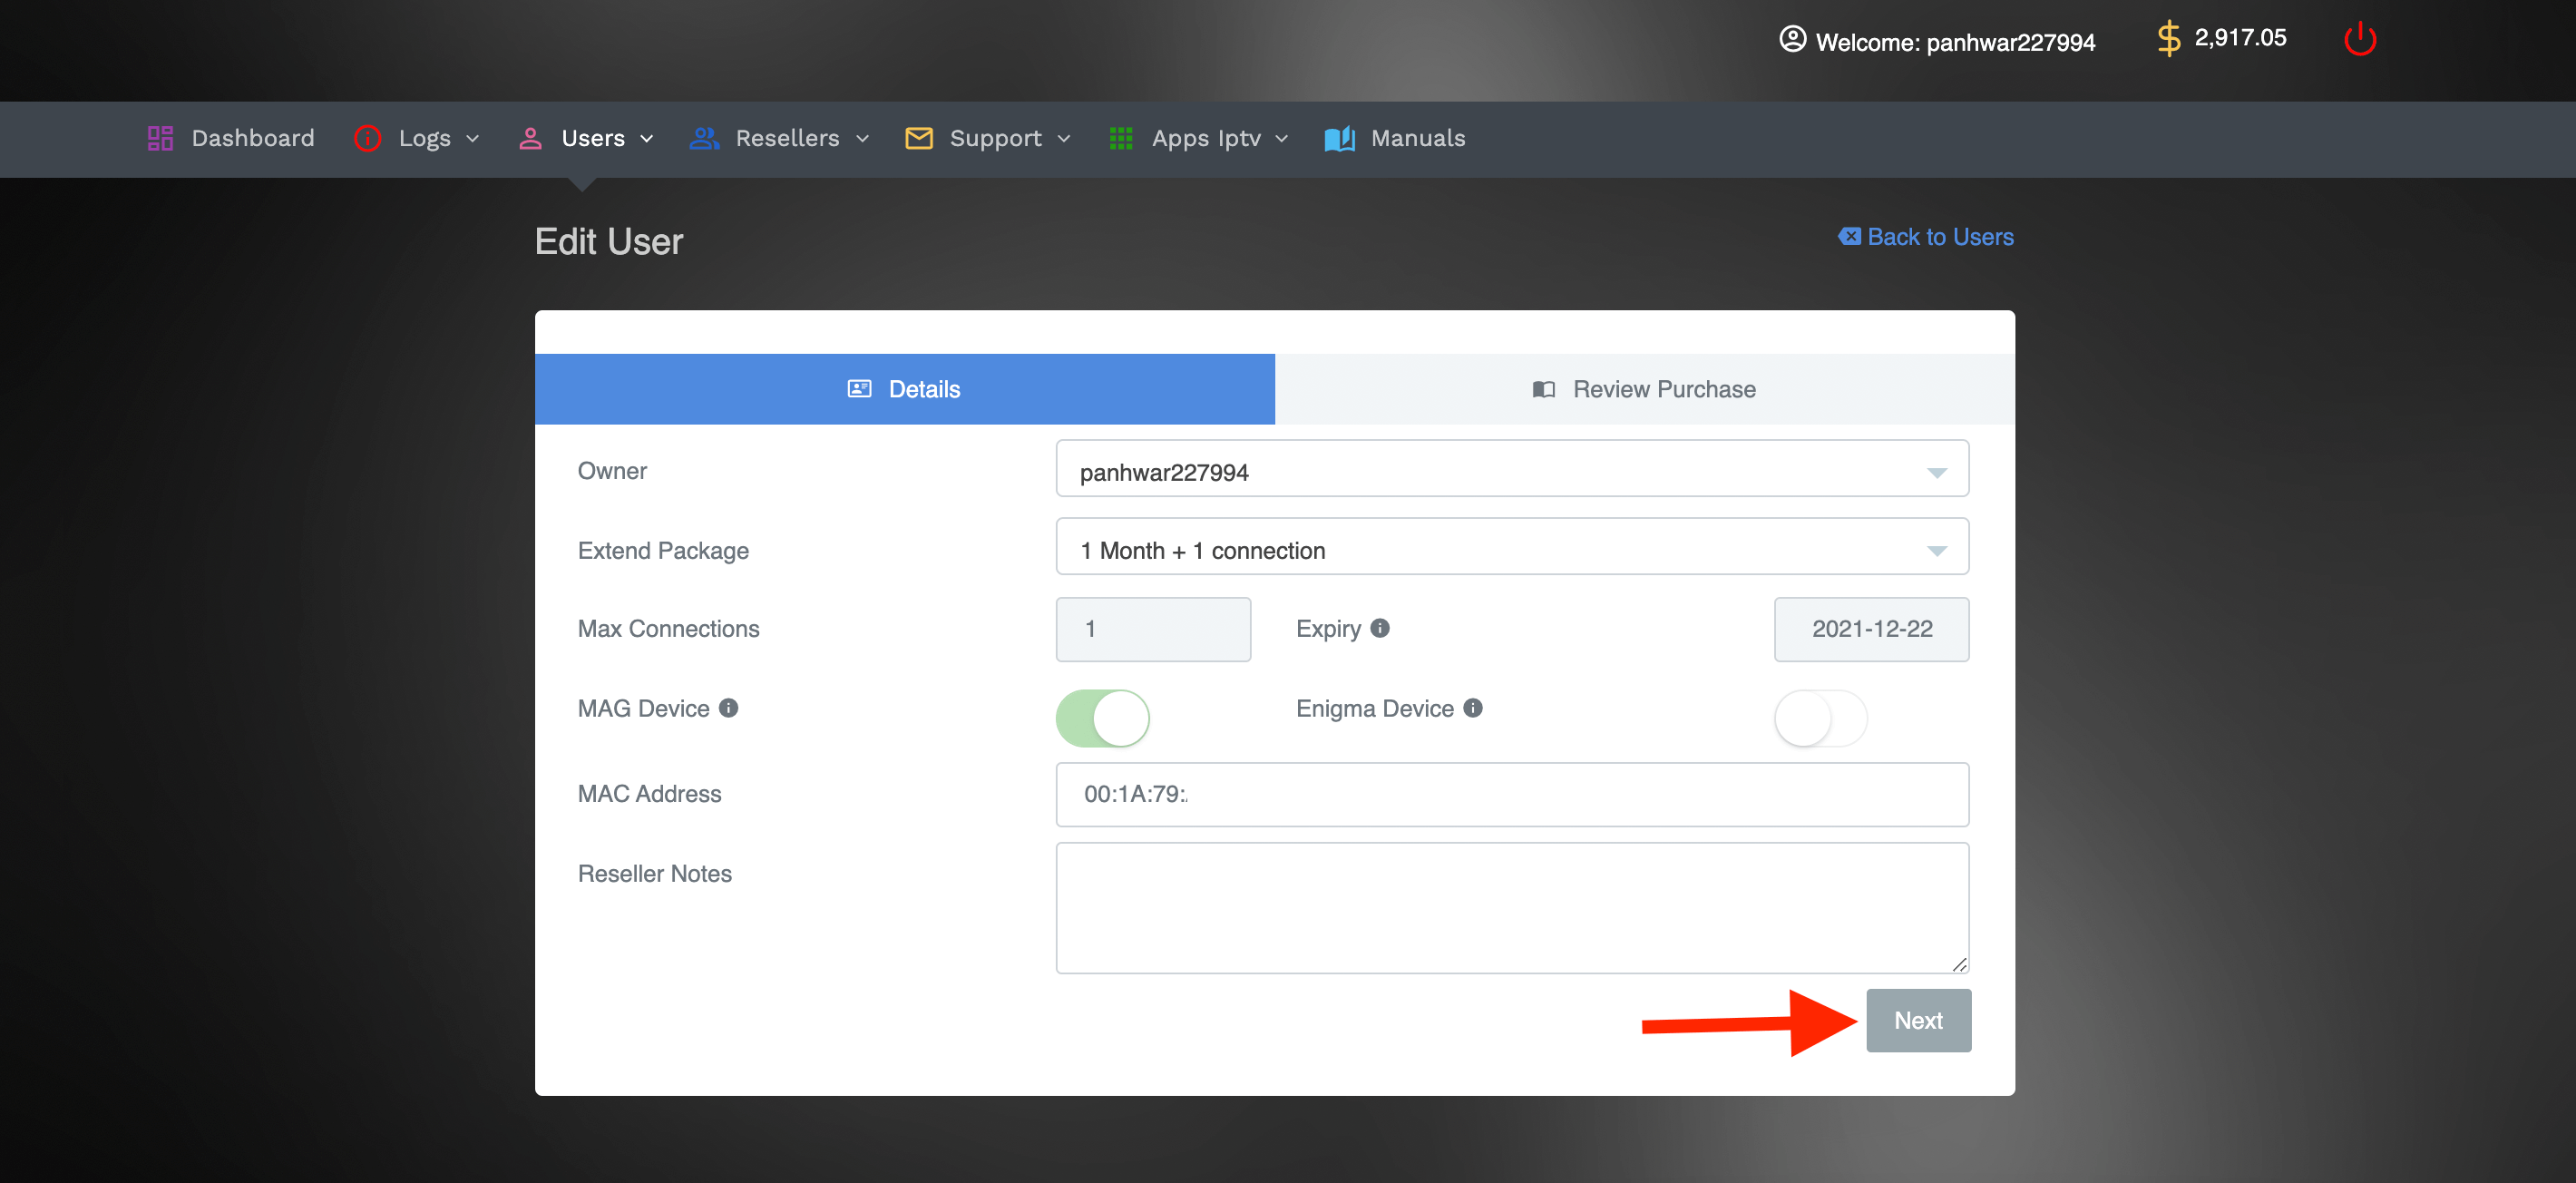
Once you choose the Plan then click Next available below.
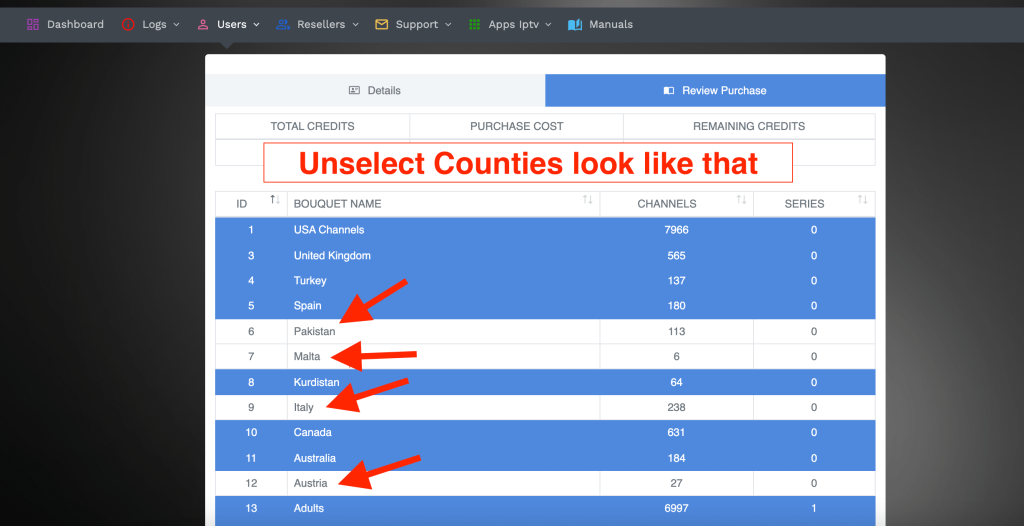
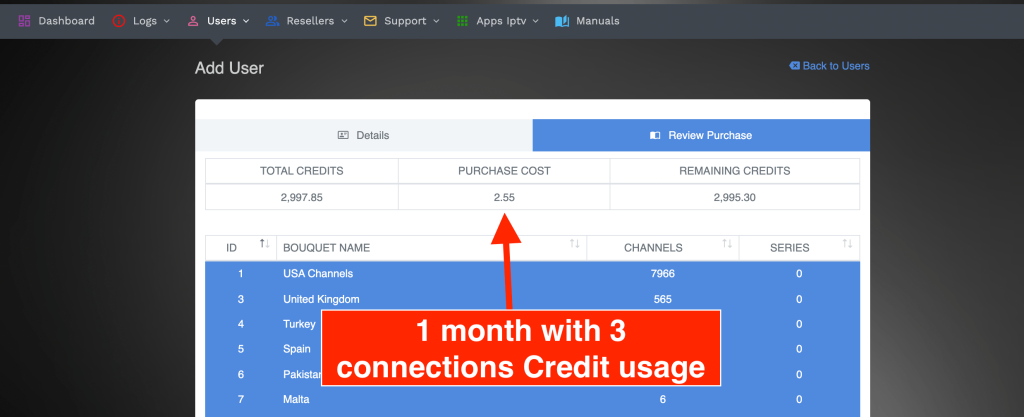
From the next screen you will see Current Credits, the Cost of the Credits and the Remaining Credits as well.
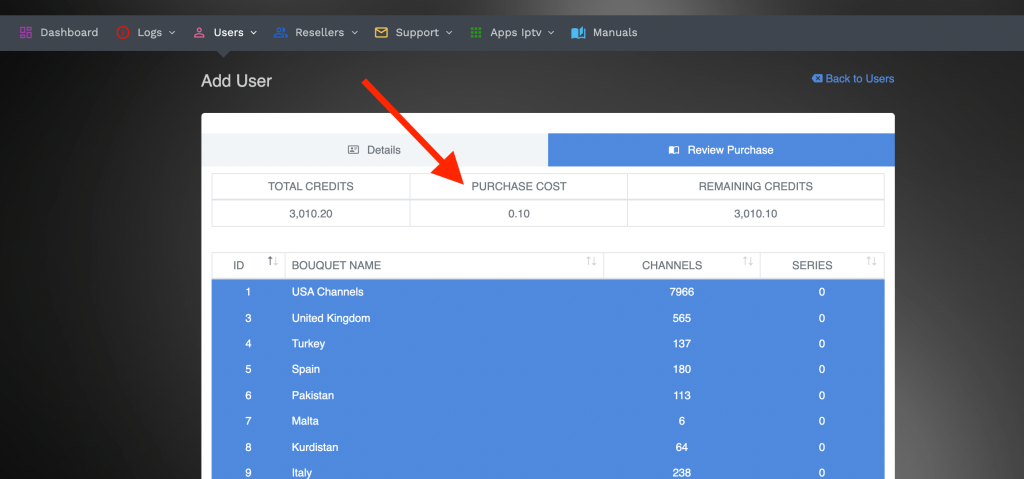
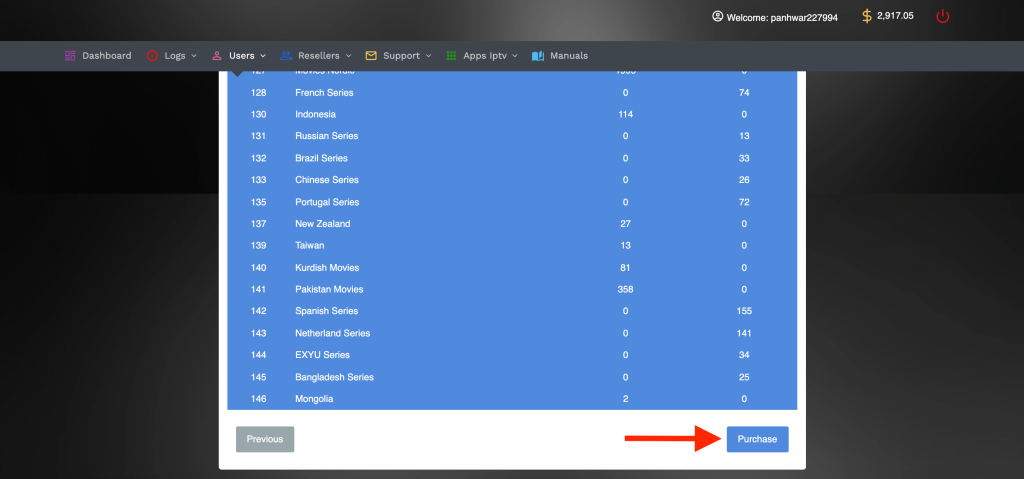
Anyways once you confirm it you need to scroll down at the bottom and hit the Purchase button.
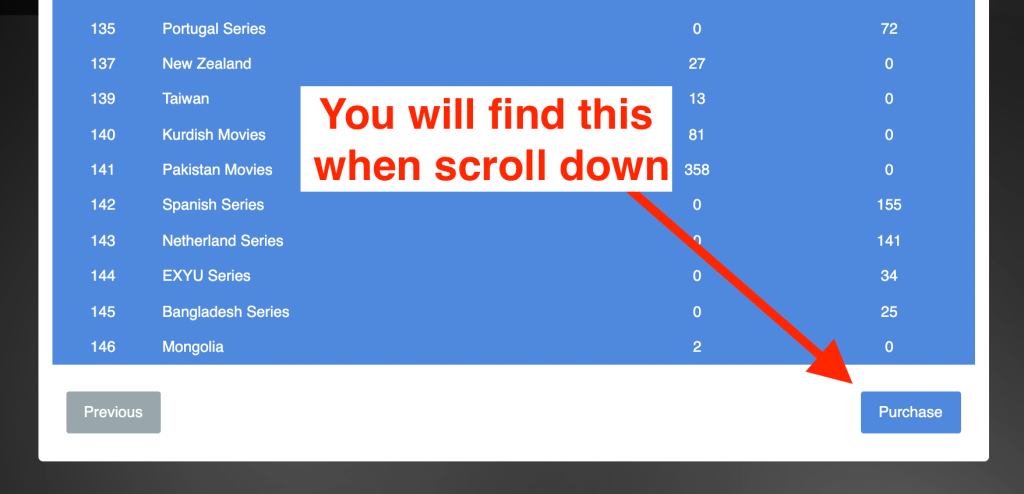
Note: You can remove the channels from the user’s list by clicking on the Countries name.
As we have already mentioned that our service offers multiple connections too. This means you also get this option where you can sell multiple connections to the customers.
However, keep in mind that adding more connections to the plan cost you more credits than without connections. Therefore make sure to put the pricing of the plans accordingly.
Anyways here are the instructions to Add connections:
Click on the Add User and then put the username and password in the Box. After that you need to click on the Packages box and here you will see all the Plans with different connections.
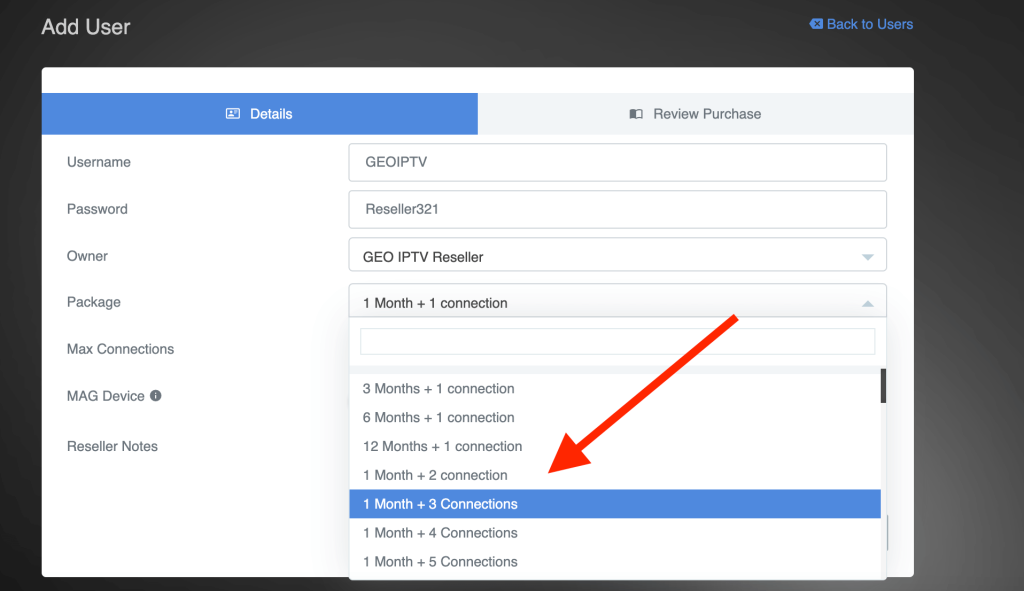
Just scroll down and choose the Plan you want to purchase with multiple connections. Once you choose the plan and number of connections just click Next.
After that you just need to scroll down and hit the Purchase button to avail this plan.
For instance, if your customer doesn’t want to continue his/her service then you can turn their service off by either disabling the account or simply deleting it.
To learn how to disable an account just follow these instructions;
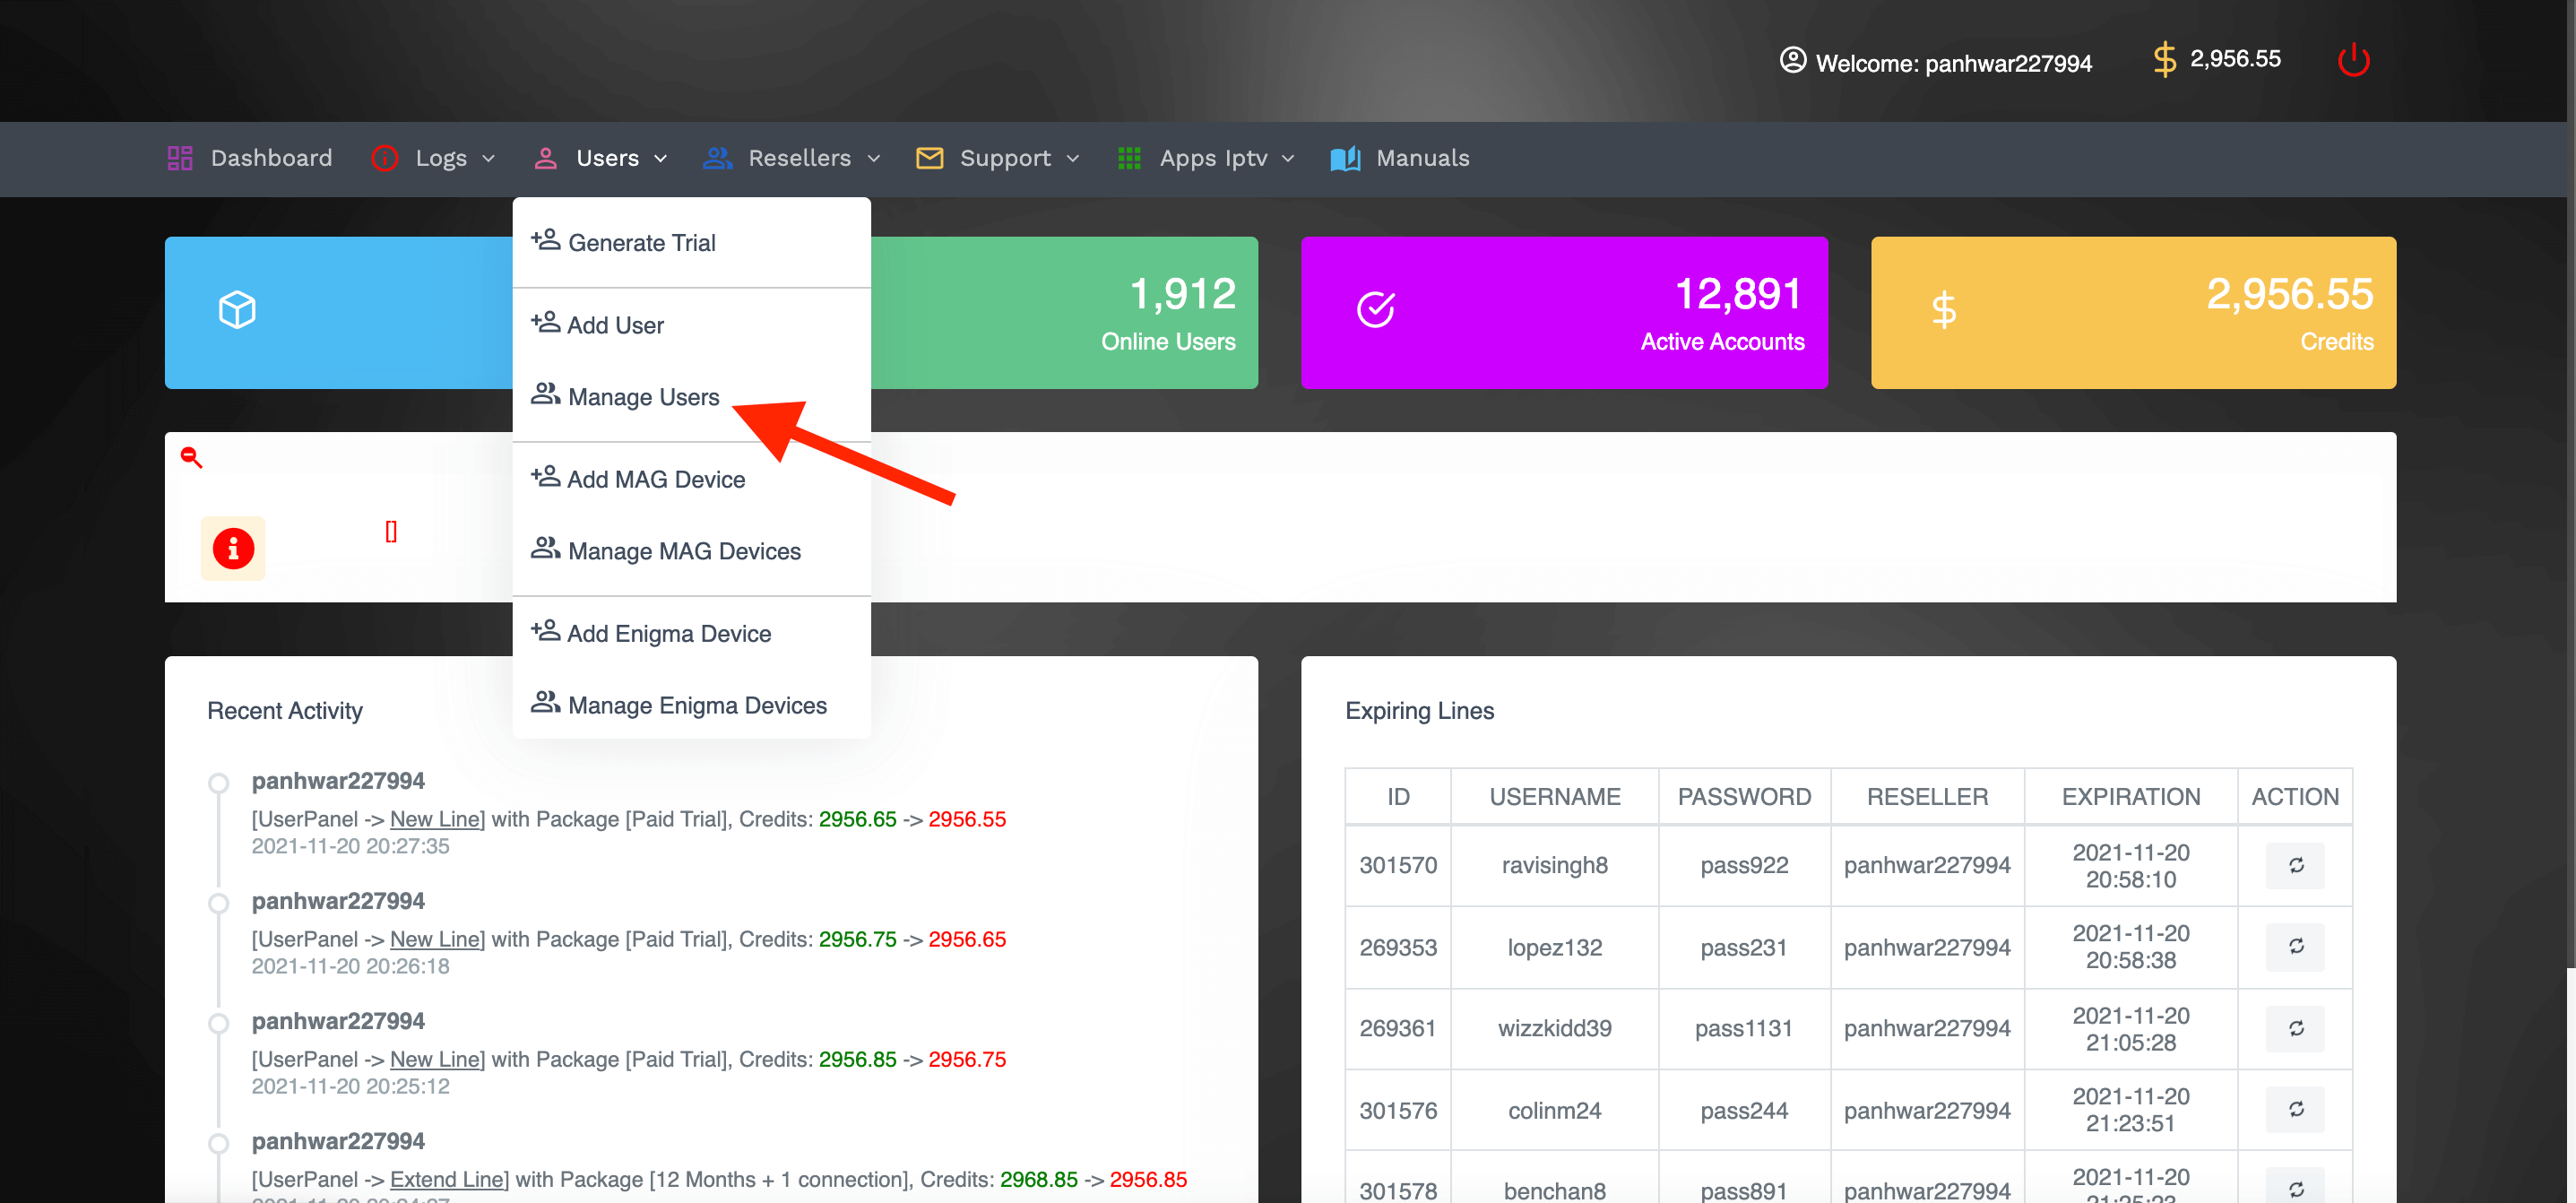
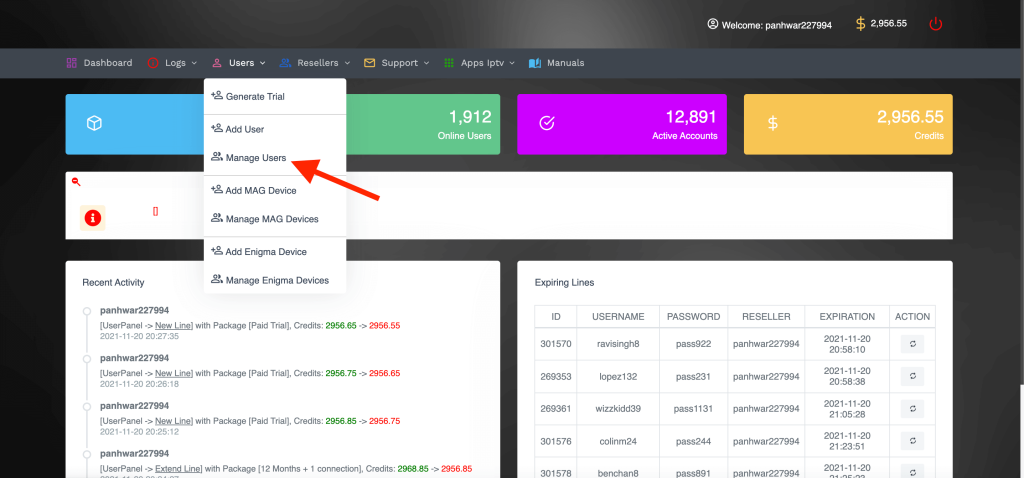
First of all login to the Dashboard using the credentials you get through email. Once you are logged in then hover to the Users and then click on Manage Users.
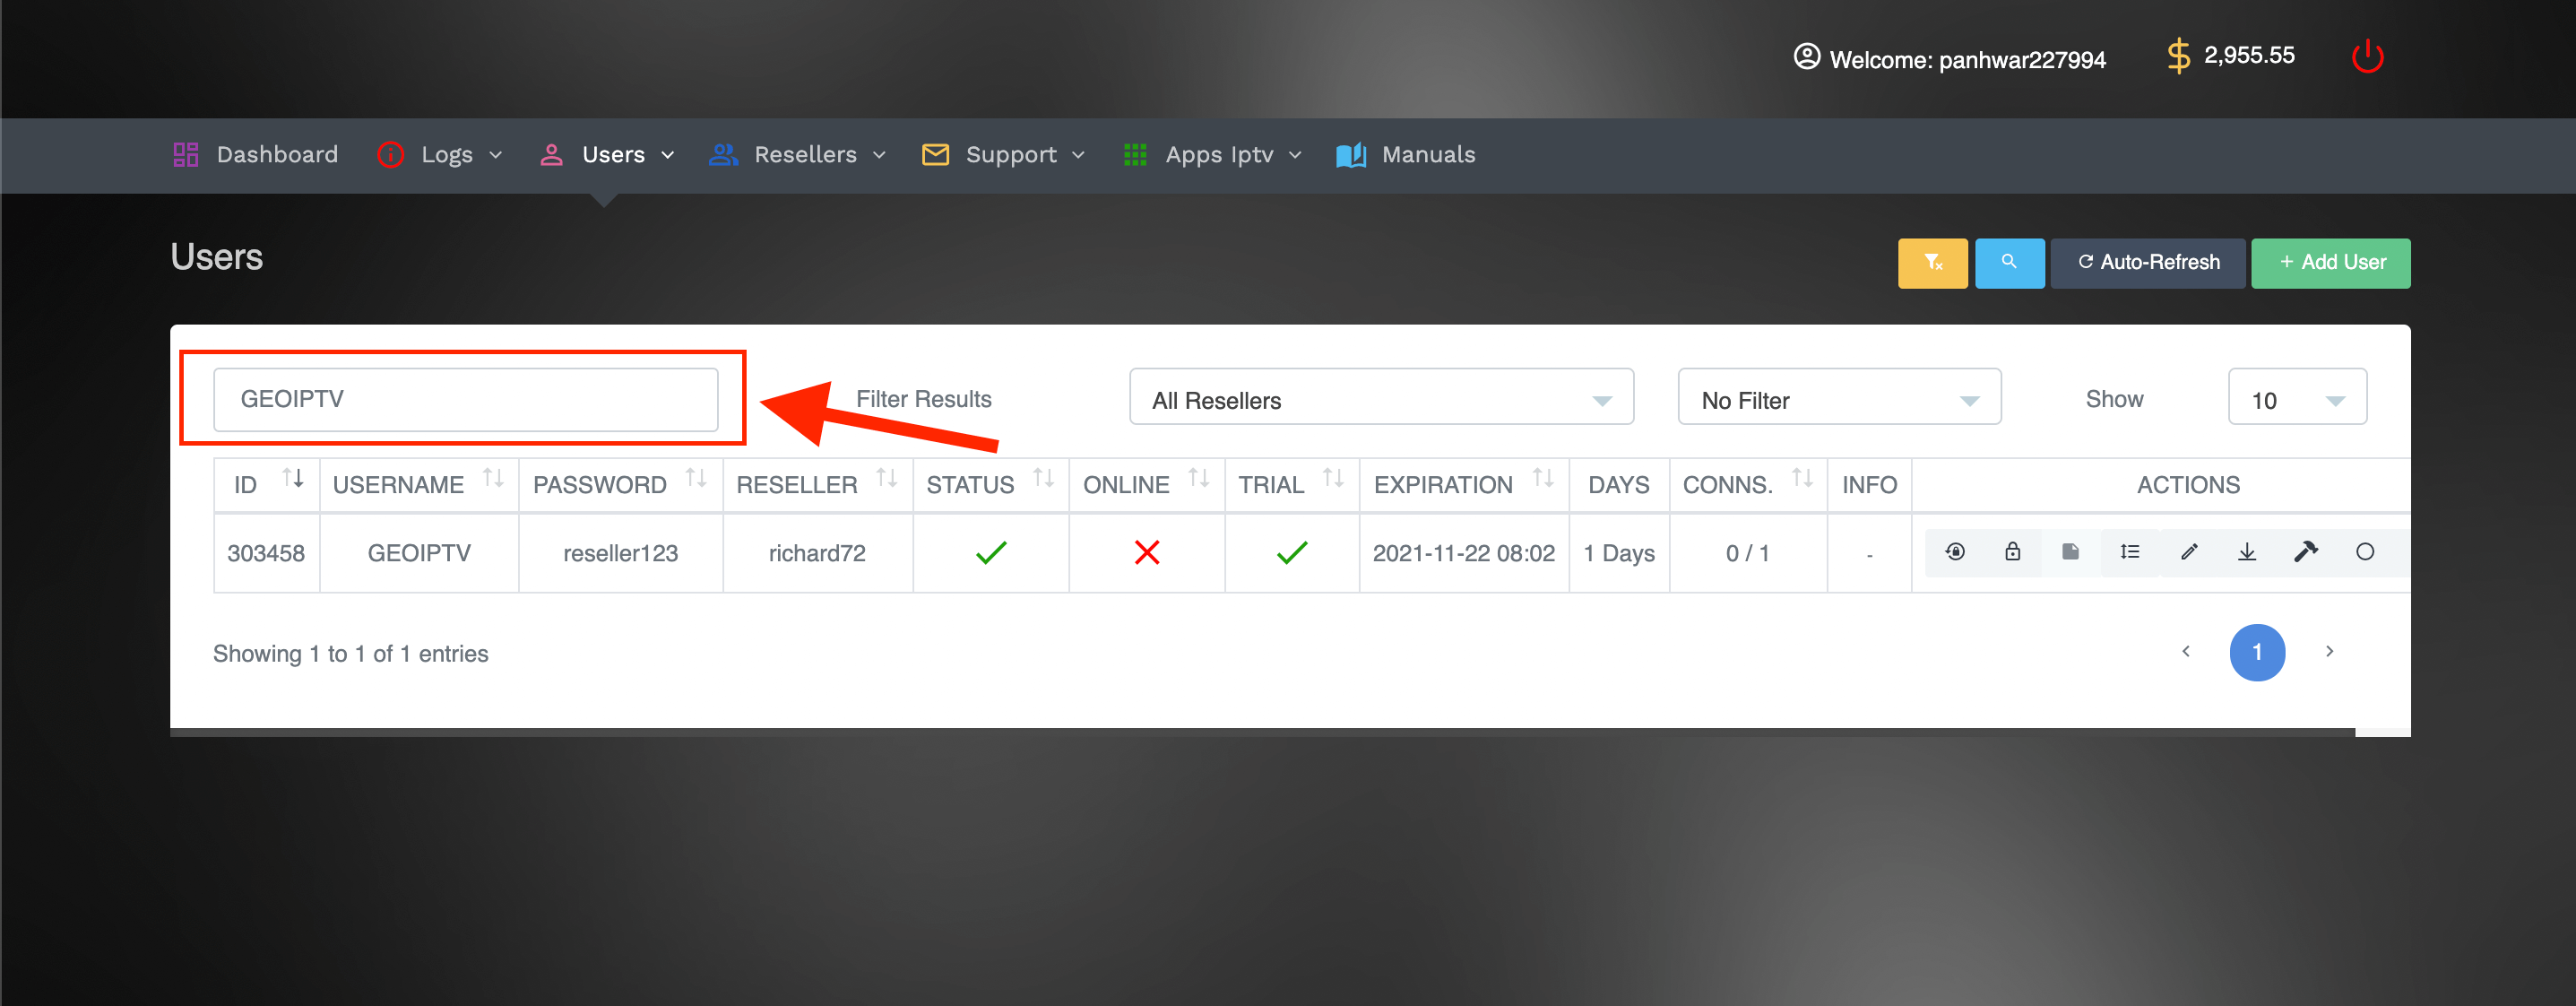
After that just find the User that you want to Disable or Delete, you can use the Search box too.

Once you find the User then from the right side you will see X and the O icon, the icon X means delete and the O means disable.
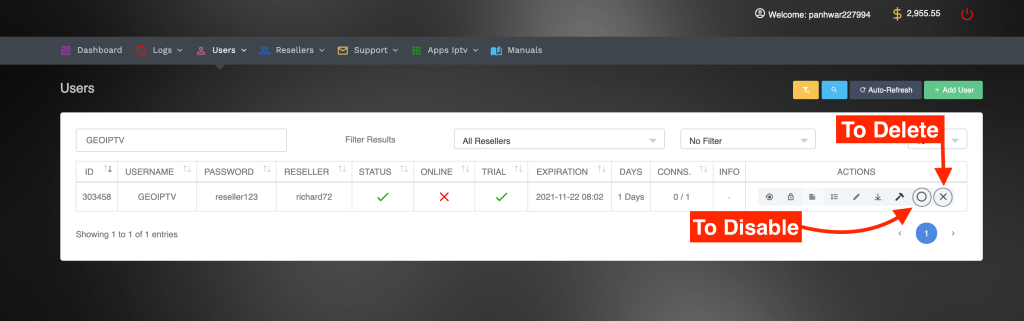
Just click on the X or O, depending on what you want to do and then the user’s account will be Deleted or Disabled.
Note: Deleting the user’s account won’t revert the credits, therefore you can change its username and sell it to other users instead of deleting it.
Now in case you got an order from the customers using MAG or Enigma devices then you need to ask them for the MAC Address. The reason is that the MAG and Enigma don’t support the installation of applications unlike Android or other devices. Instead, they need a service pointed to their MAC address to run it.
Well, you can follow these instructions to activate an Enigma or the MAG device:
First of all, log in with the credentials you were provided by GEO IPTV.
Once you are logged into the Dashboard hover to the Users and then click on the Add MAG/Enigma Device.
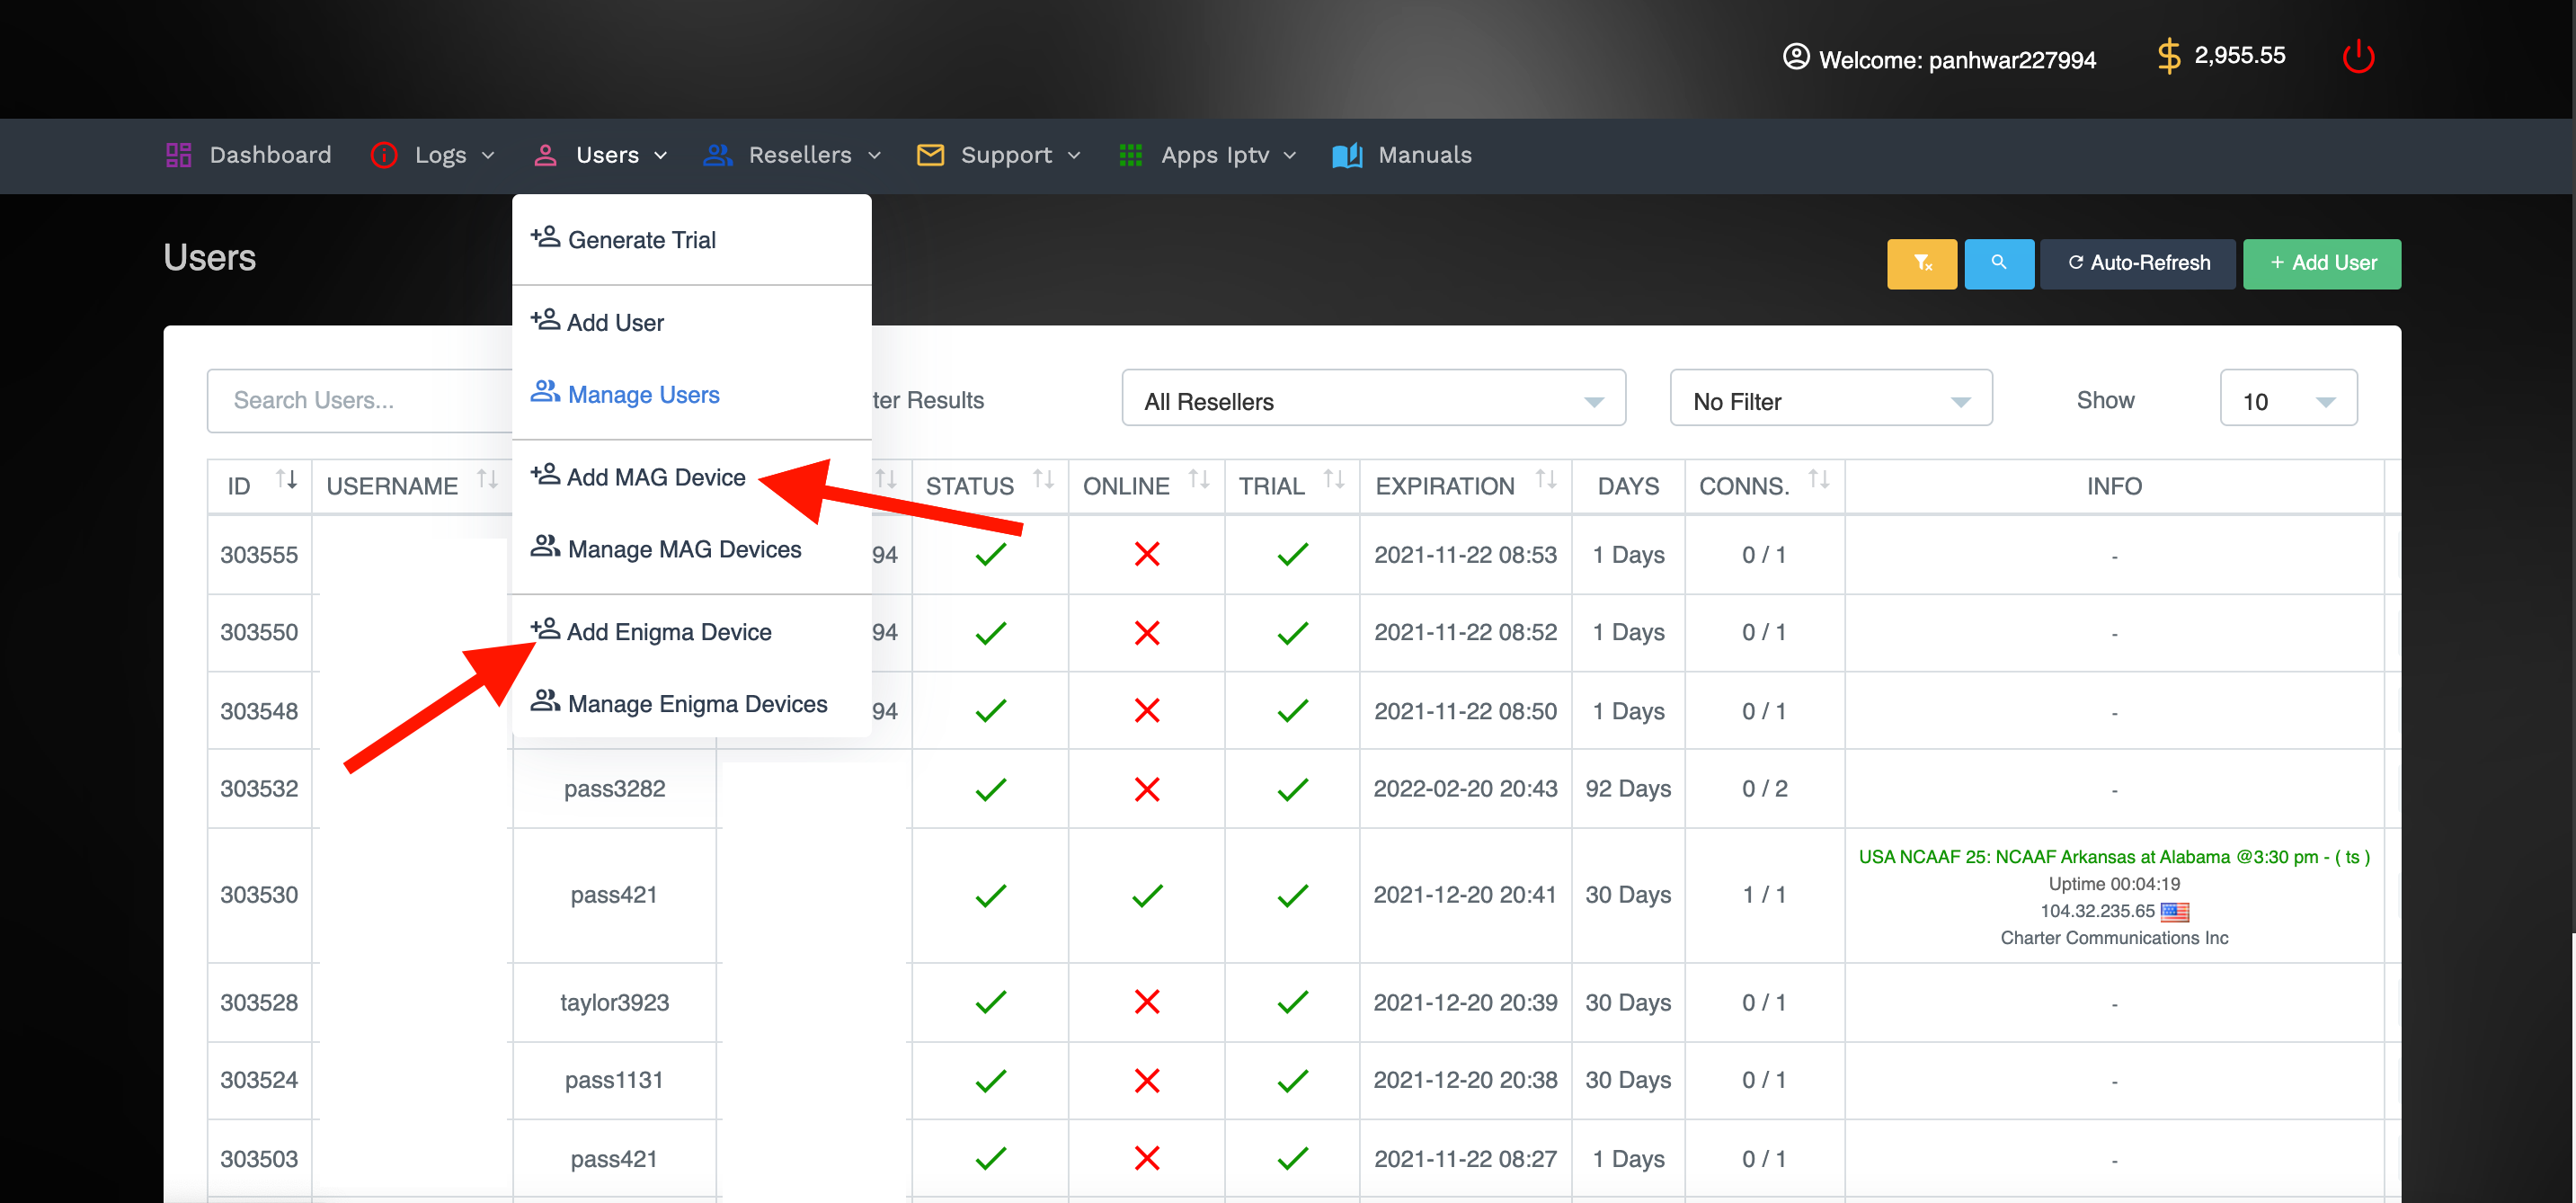
In the next screen you won’t see username and password boxes but instead, a new Box labelled MAC Address.

Now copy the MAC address that was given by the customer and put it in the MAC address box.
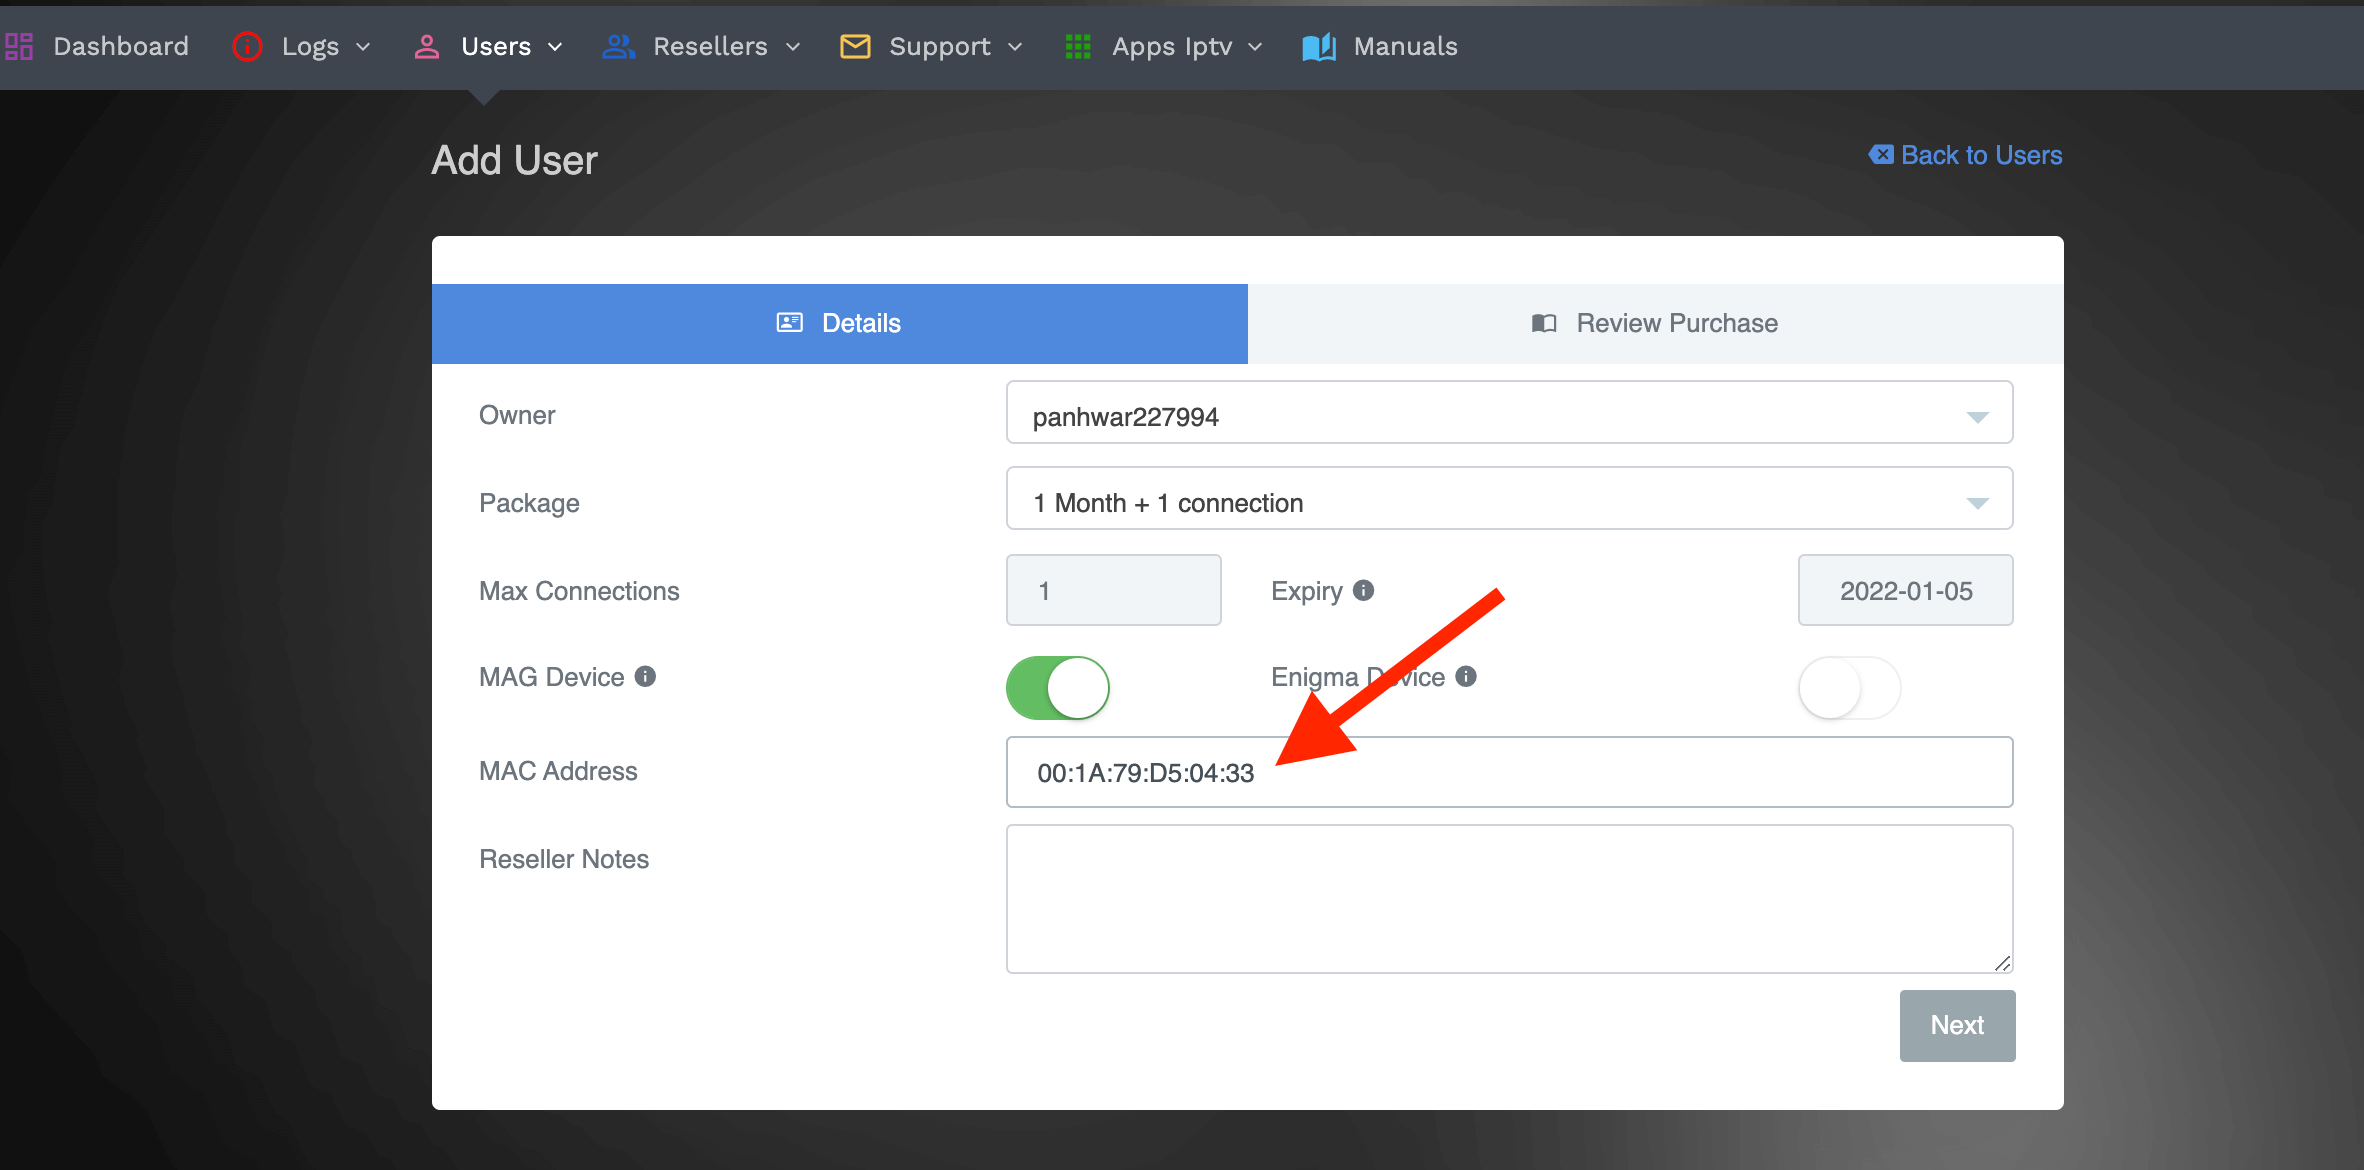
After that you can select the plan that you want to buy for the customer like 1 month, 3 months or whatever you like from the Package Section.
Note: MAG and Enigma devices cannot avail of multiple connections plan so ask them to buy the subscription separately for every device.
Once you choose the plan then simply click on the Next.
After that just choose the channels you want to remove from the list and hit the Purchase button.

The account will be purchased right after that and now you just need to provide them with the Portal URL that was given to you through the email.
As you know that our service comes with more than 20,000 live TV channels from all over the world. Therefore if someone is facing trouble finding the channels or else the app gets loaded then you can edit bouquets to remove unwanted channels.
This is one of the useful features that you probably need to learn since many customers don’t like the huge list and even it will help them from unexpected loading and buffering too.
Anyways just follow these instructions to edit bouquets easily:
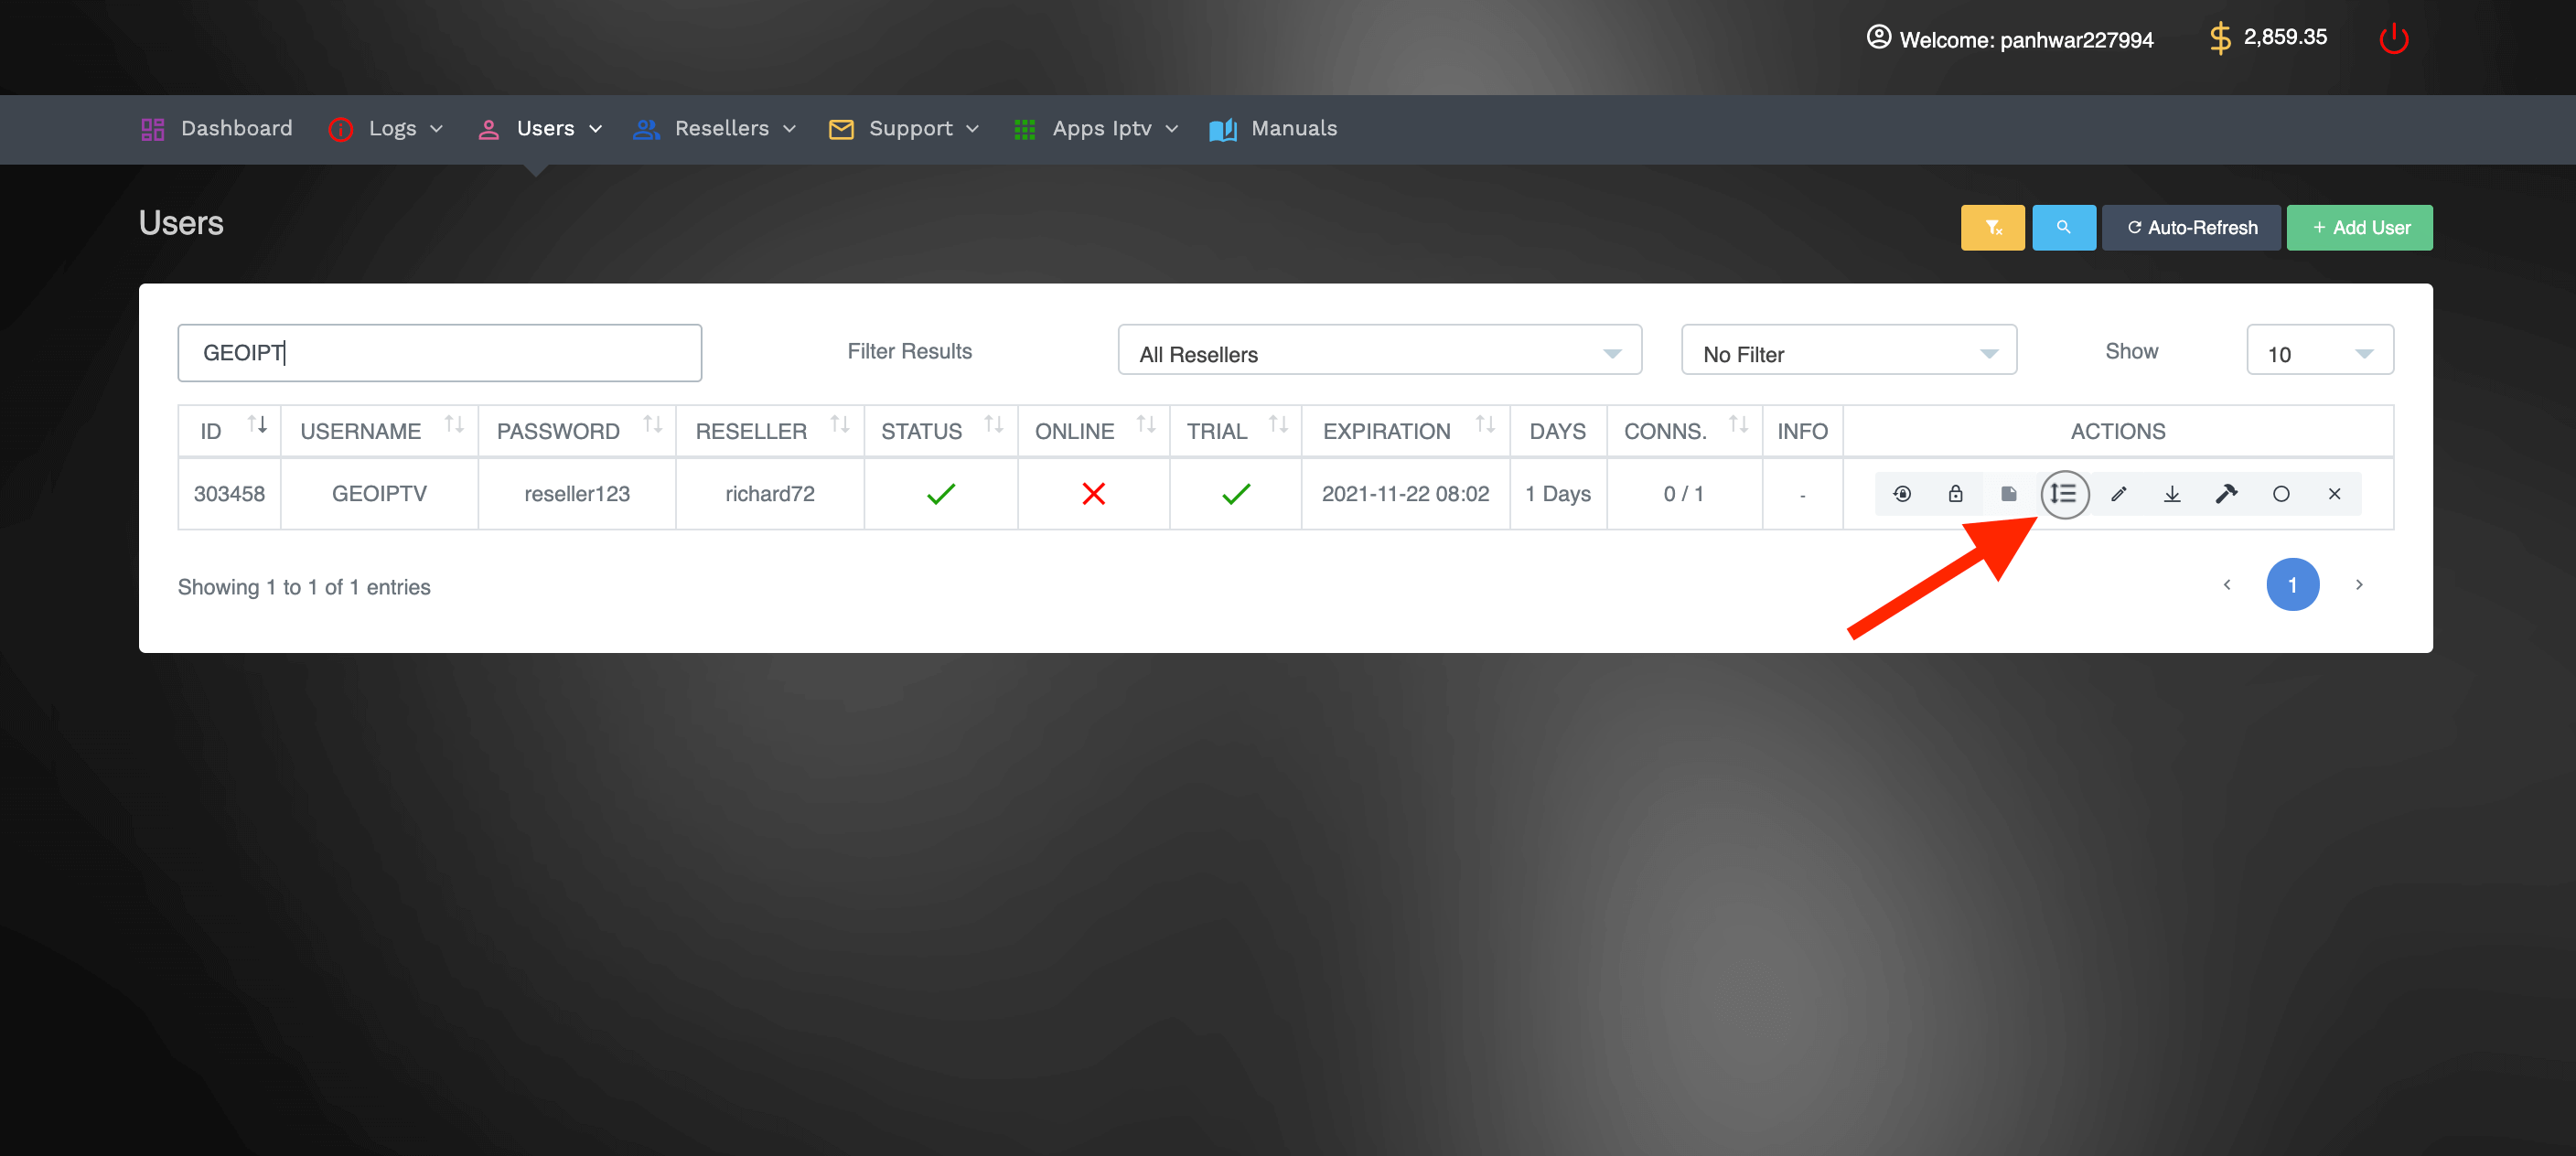
1 Once you are logged into the IPTV Reseller Panel then hover to the Users and then open Manage Users from there.
2 After that use the Search box and find the user you want to edit bouquets for.
3 Now from the right-hand side click on the 3-Lines icon as shown in the Screenshot Below.
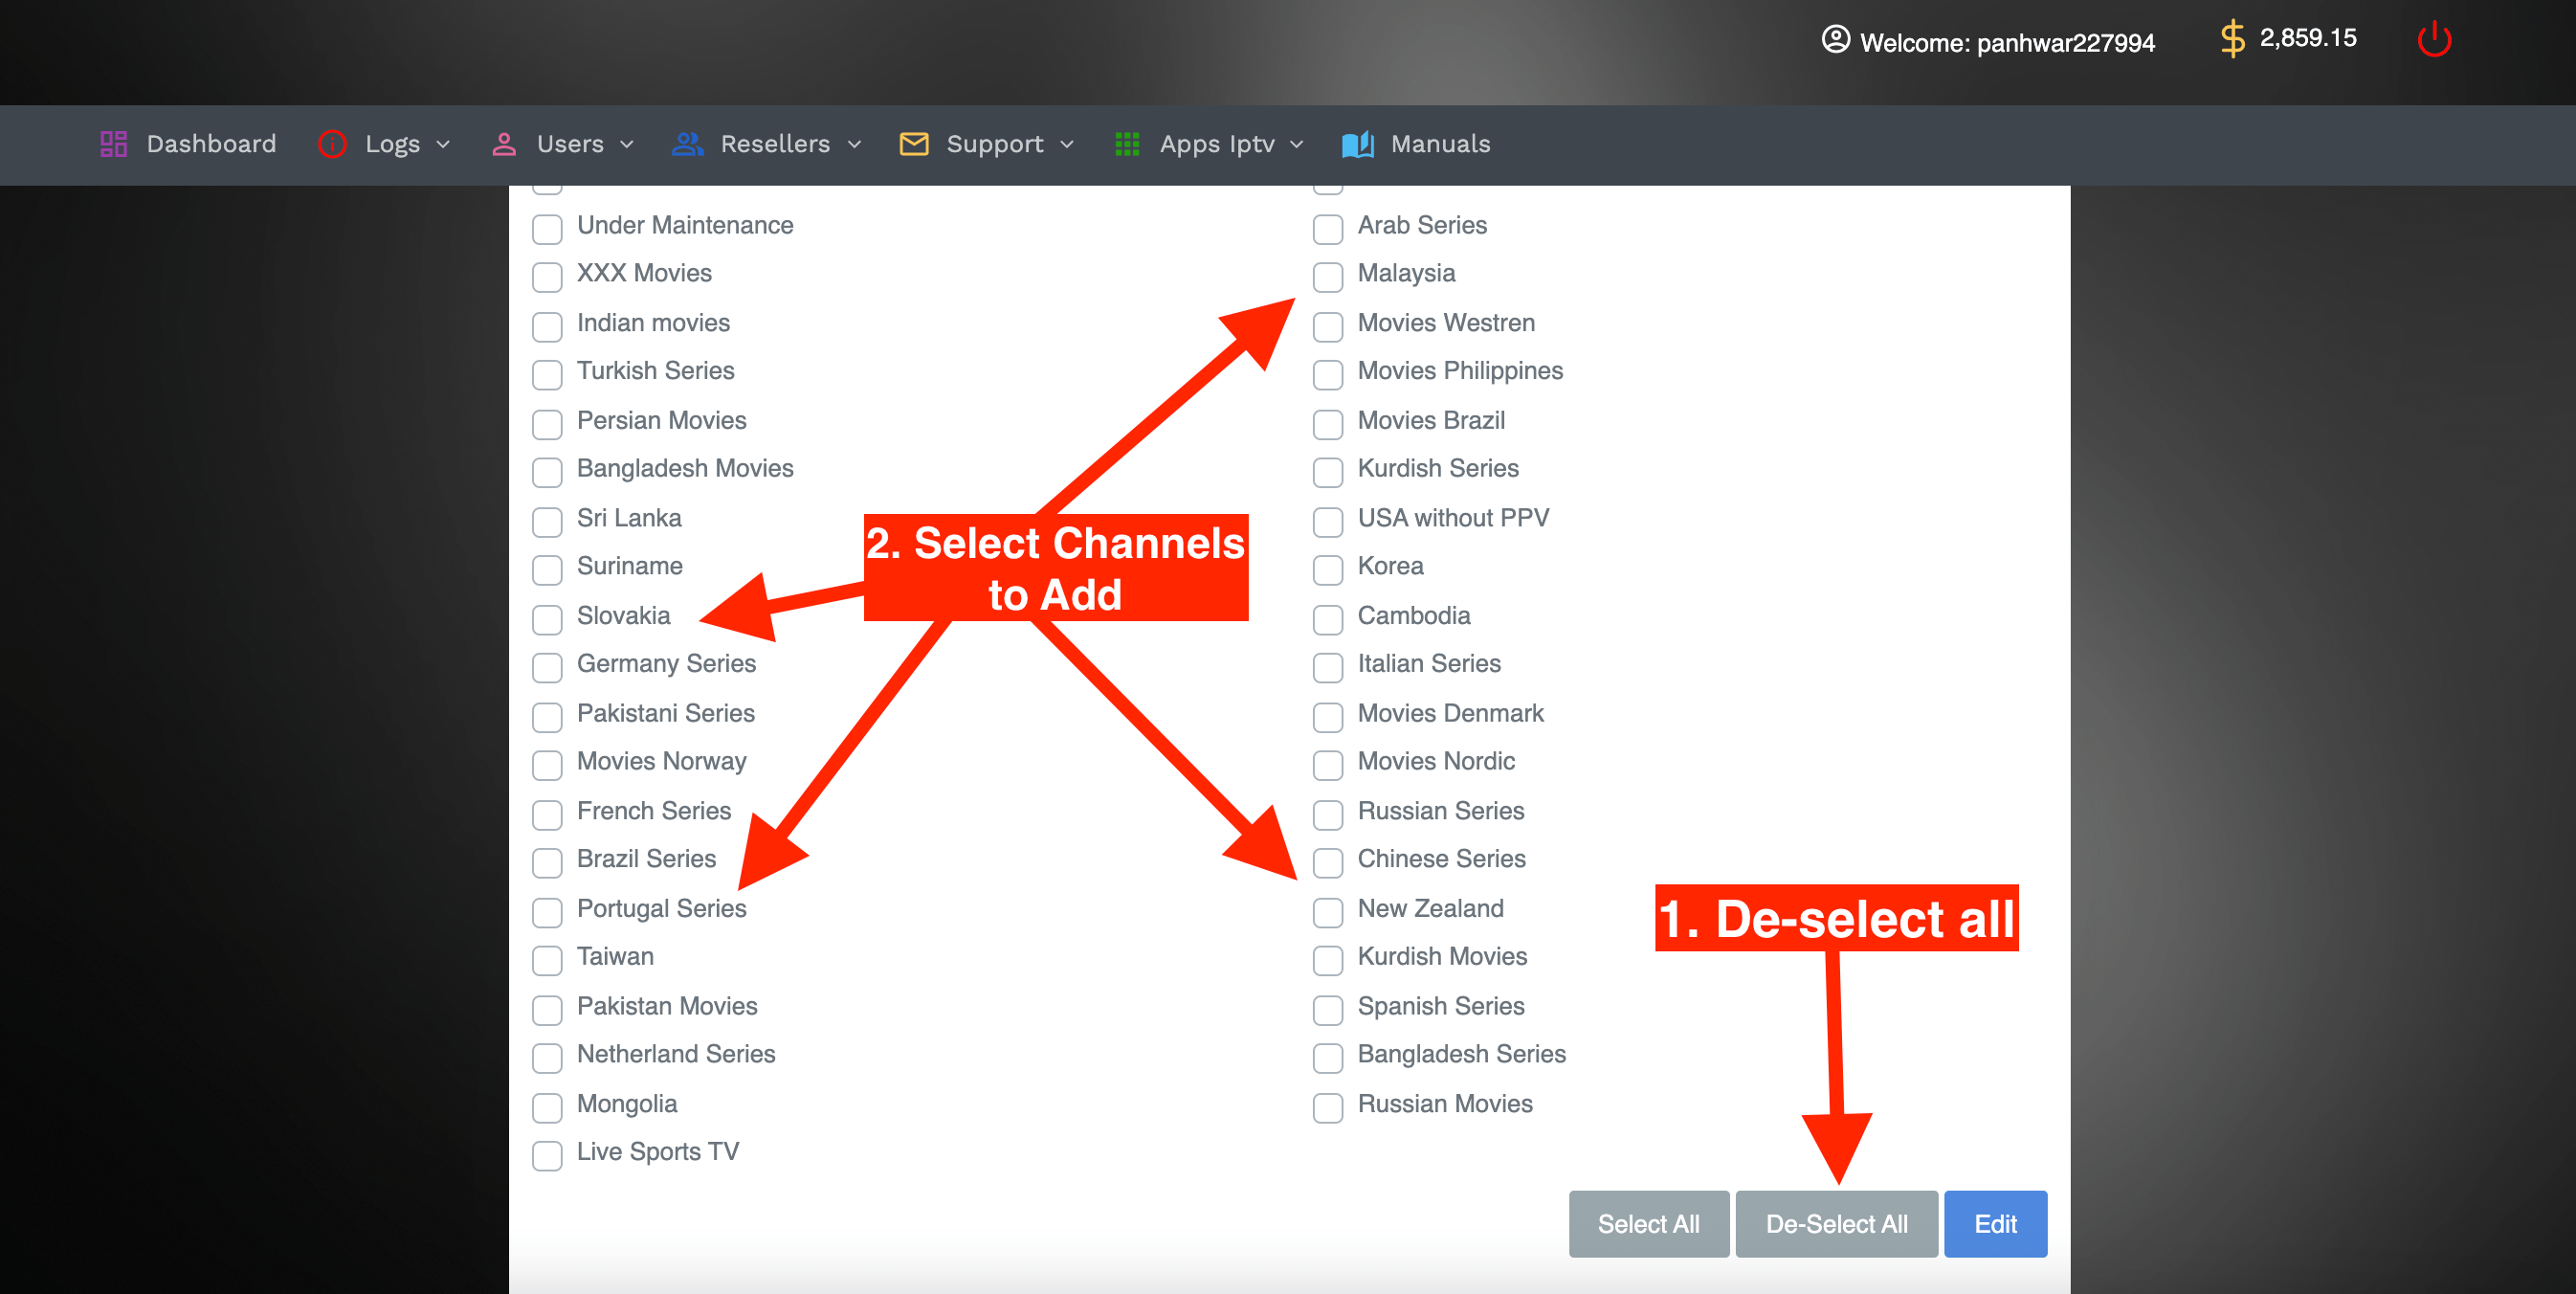
4 From the next screen you will see the List of Channels that we offer. Just click on Deselect All and then you can select the channels that you want to keep for the customer.
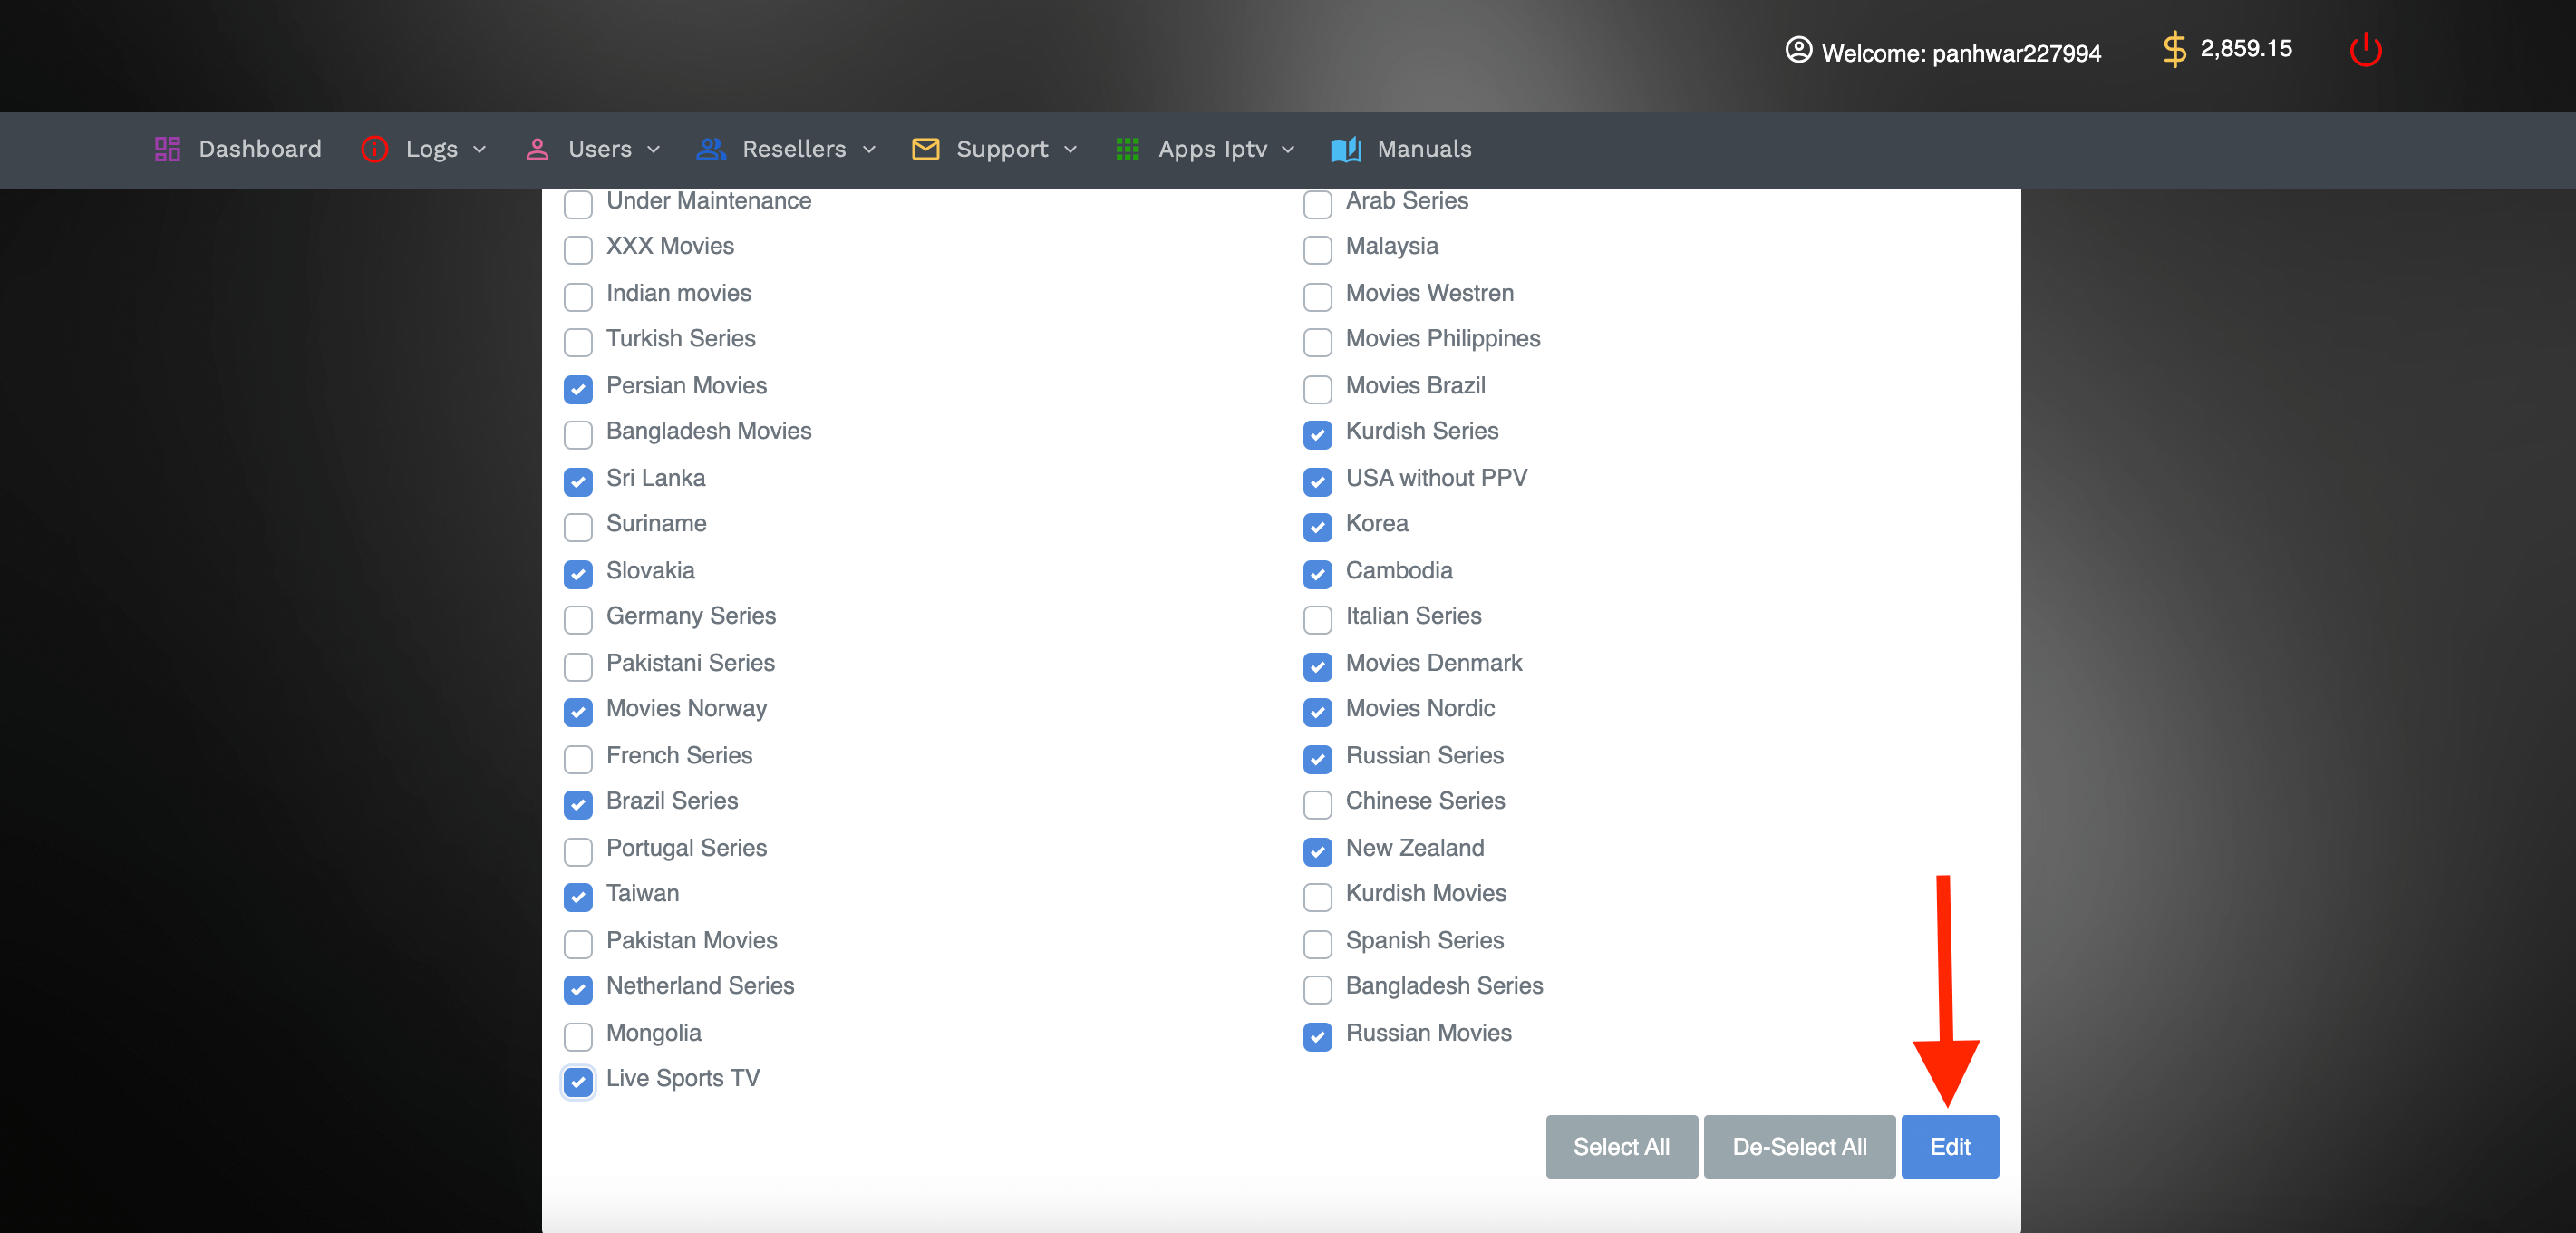
5 Once all channels have been selected just click the Edit button at the bottom and other channels that were not selected will be removed from the service.
With our service, you can provide your customers with the Xtream Codes and as well as the M3U URL. With this, you can attract more customers because most people want to use M3U instead of Xtream Codes.
Anyways you can get the M3U for customers by following these instructions:
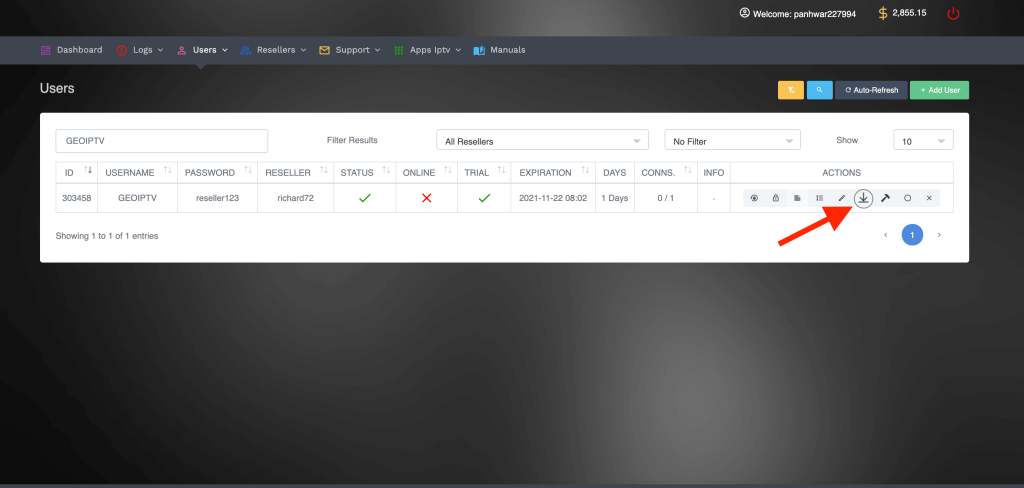
1 Go to your Dashboard and then hover the to Users and click on Manage Users.
2 After that just find the User by going to the Search box.

3 Once the user appears on the screen click on the Download Icon (as shown in the screenshot).
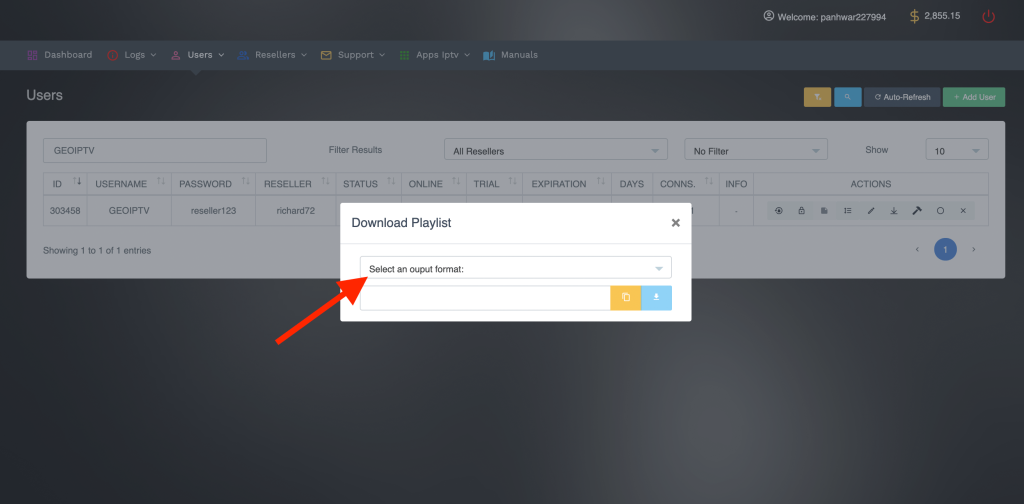
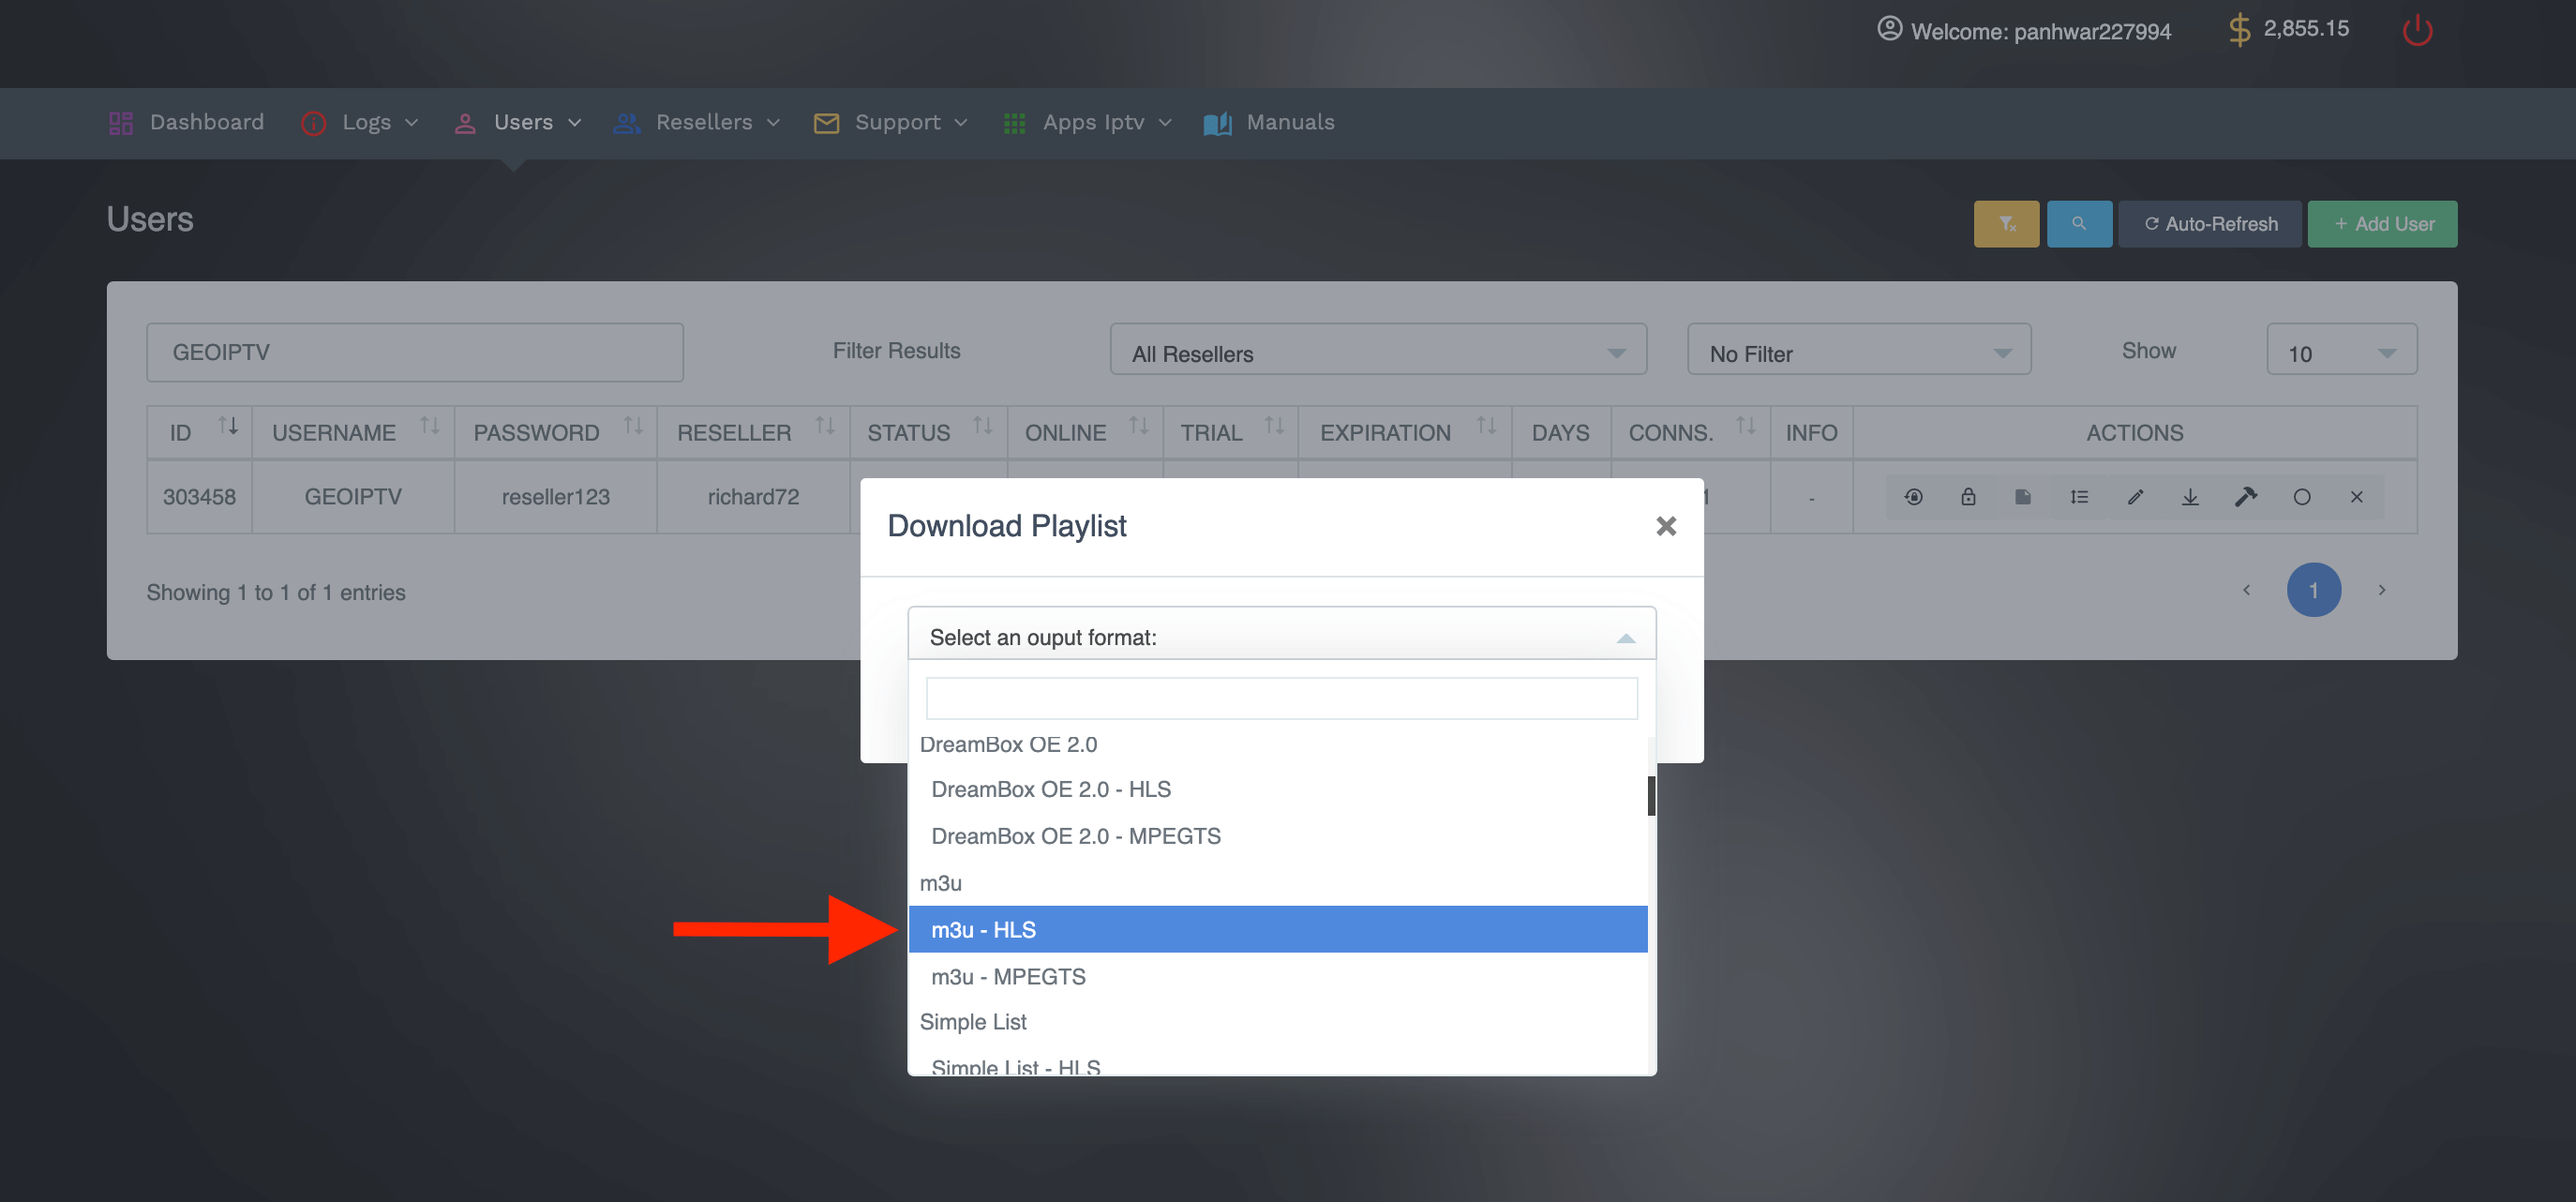
A new window will appear on the screen so from here click on Select an Output Format and then scroll down to find M3U-HLS.
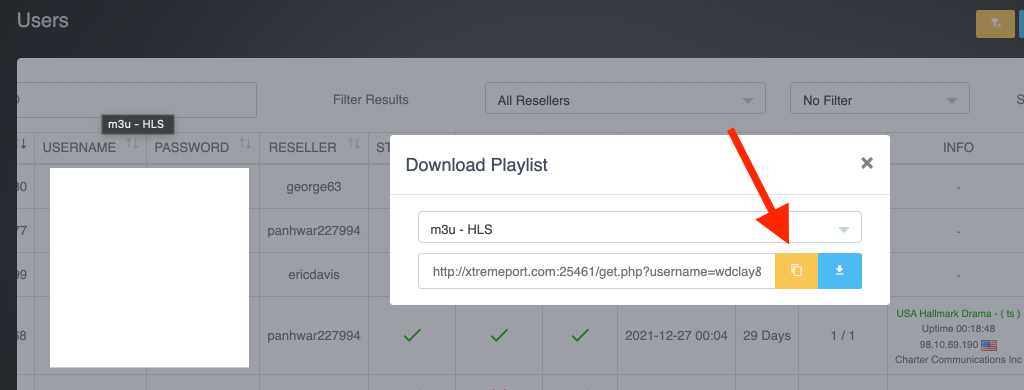
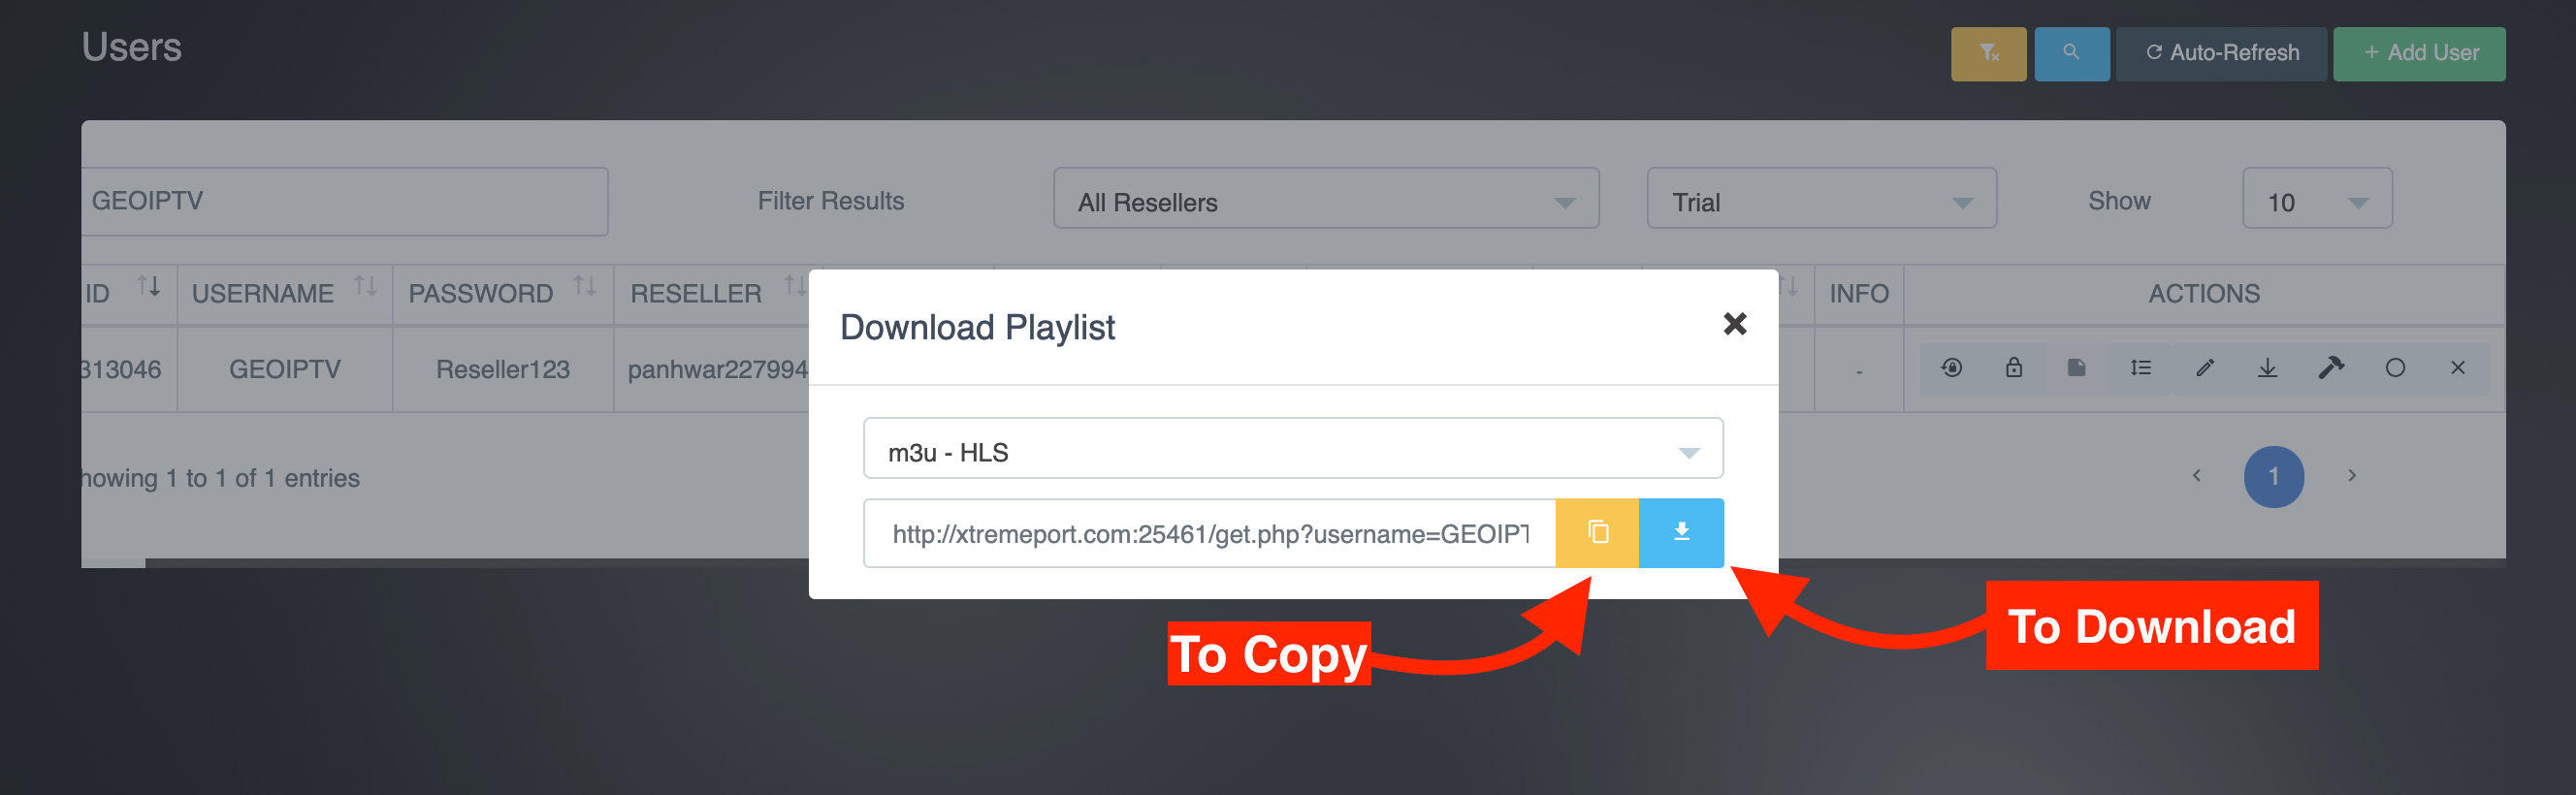
After that click on the M3U-HLS and then select the Copy button to provide the URL or the Download (if you want to send the File instead).

When you copy the URL just send it to your customer and then they can put it in the application to use the service.
Now that you understand how to get M3U, edit and add new users, and other stuff, the next thing you need to learn is what credentials your customers need to use their subscription?
This is the must learn a guide for those who are completely new to the IPTV business. Therefore if you are new and want to learn how to use our service then make sure to read this section.
Okay so without wasting further time let’s dig in:
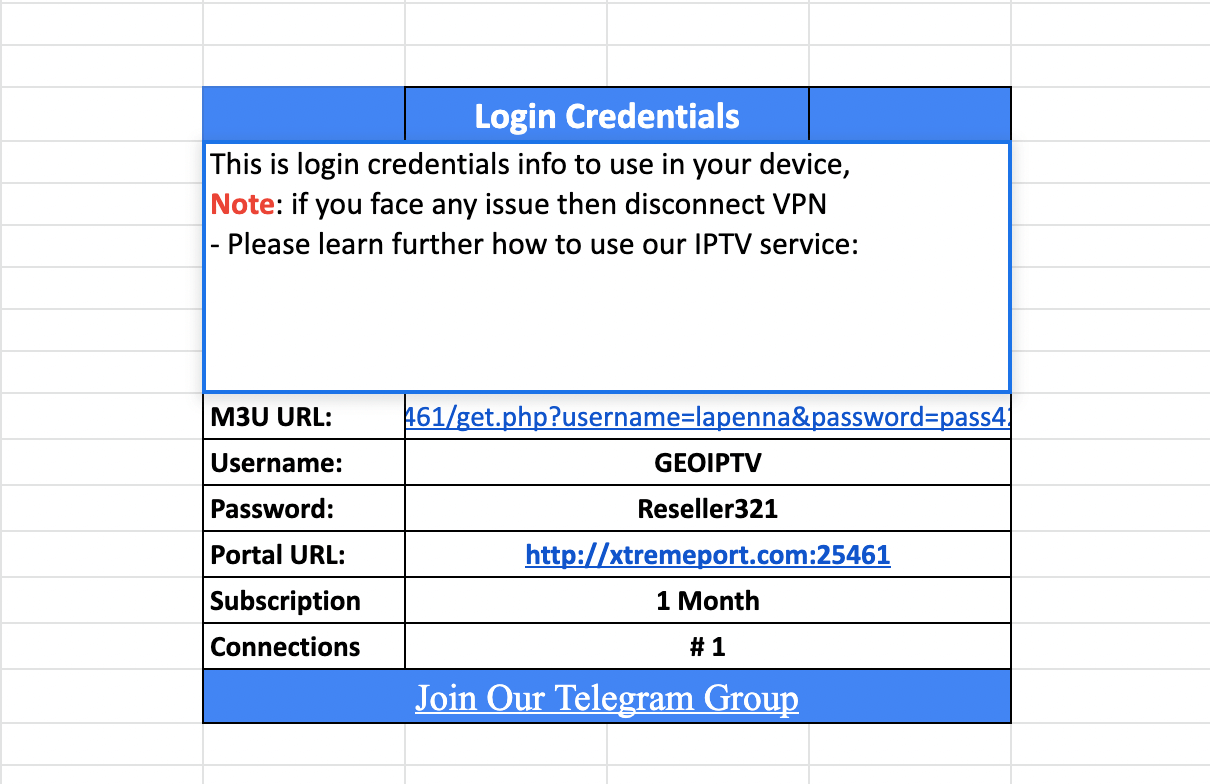
You need to details these details to your customers so the can login into their Xtream Codes API Player.
Username:
Password:
Portal URL: http://xtremeport.com:25461
Note: Portal URL is same for all customers
Example template:
Xtream Codes Login: The first thing and the most used method to log in to the service is the Xtream Codes. It is because many customers prefer using username and password instead of M3U.
The reason is simple as the M3U URL is quite long to type on a TV while the username and password take only a few minutes to log in. Therefore if you want to give them a username and password then check out the below steps to learn how to get Xtream Codes to log in information:
1 Open the IPTV reseller panel’s Dashboard and then hover to the Users and select Add User.
2 After that fill the form and input Username, Password and select the Plan you want and then click Next.
3 From the Next screen just remove the channels that you don’t want to send and then hit Purchase.

4 Now the plan is activated so copy the Username and Password that you created and send it to your customer.

This is how you can create Xtream Codes log in information for the customers, now you need to send it along with the Portal URL that was given from Xtreme HD IPTV through the email address.
M3U URL: Another method to log into the service is through M3U URL, therefore if your customers ask for the Playlist then you can also provide it to them.
It is not essential as most customers don’t use it because this method can be used on Mobile Devices, Computers, VLC Media Player and other apps like this.
So, here is how you can get the M3U URL and send it to the customers:
1 First create the username as mentioned in the Xtream Codes section and then go to Manage Users.
2 Now search for the User to whom you want to send M3U URL using Search Box.
3 After that click on the Download icon from the right-hand side.
![]()
4 From here click on the Select an Output Format and then select M3U-HLS.
5 Once you select it just click on the Copy icon to get the URL or click the Download button to get the file (we recommend offering URL instead of File).
6 Now just send the M3U URL to your customer along with the Portal URL that we sent through email.
MAG Device Users: As we know what information will be required for different customers, therefore, let’s learn what you can provide MAG devices to stream their subscription.
Basically, the MAG device users don’t need much information like username or password but instead, you can provide them with the portal URL once their Mac is activated.
To get the Portal URL just open the email that we sent to you and at the bottom of that email, you will see the Portal URLs that you can offer your customers.
Now coming to the last part of this guide which is how your customer can log in to the application? Well, that’s probably the issue because you might get tons of emails or tickets from newbies who don’t even know about IPTV service.
Therefore the best way to help them is to learn how to log in to IPTV on their own. It is because many customers use different applications so just make sure to install all of them first.
In this way, you can help them by providing complete instructions and probably gain more trust from the customers. To give you an example I am writing a guide on how to use IPTV on the IPTV Smarters Pro app.
These instructions are almost the same for most apps that use Xtream Codes:
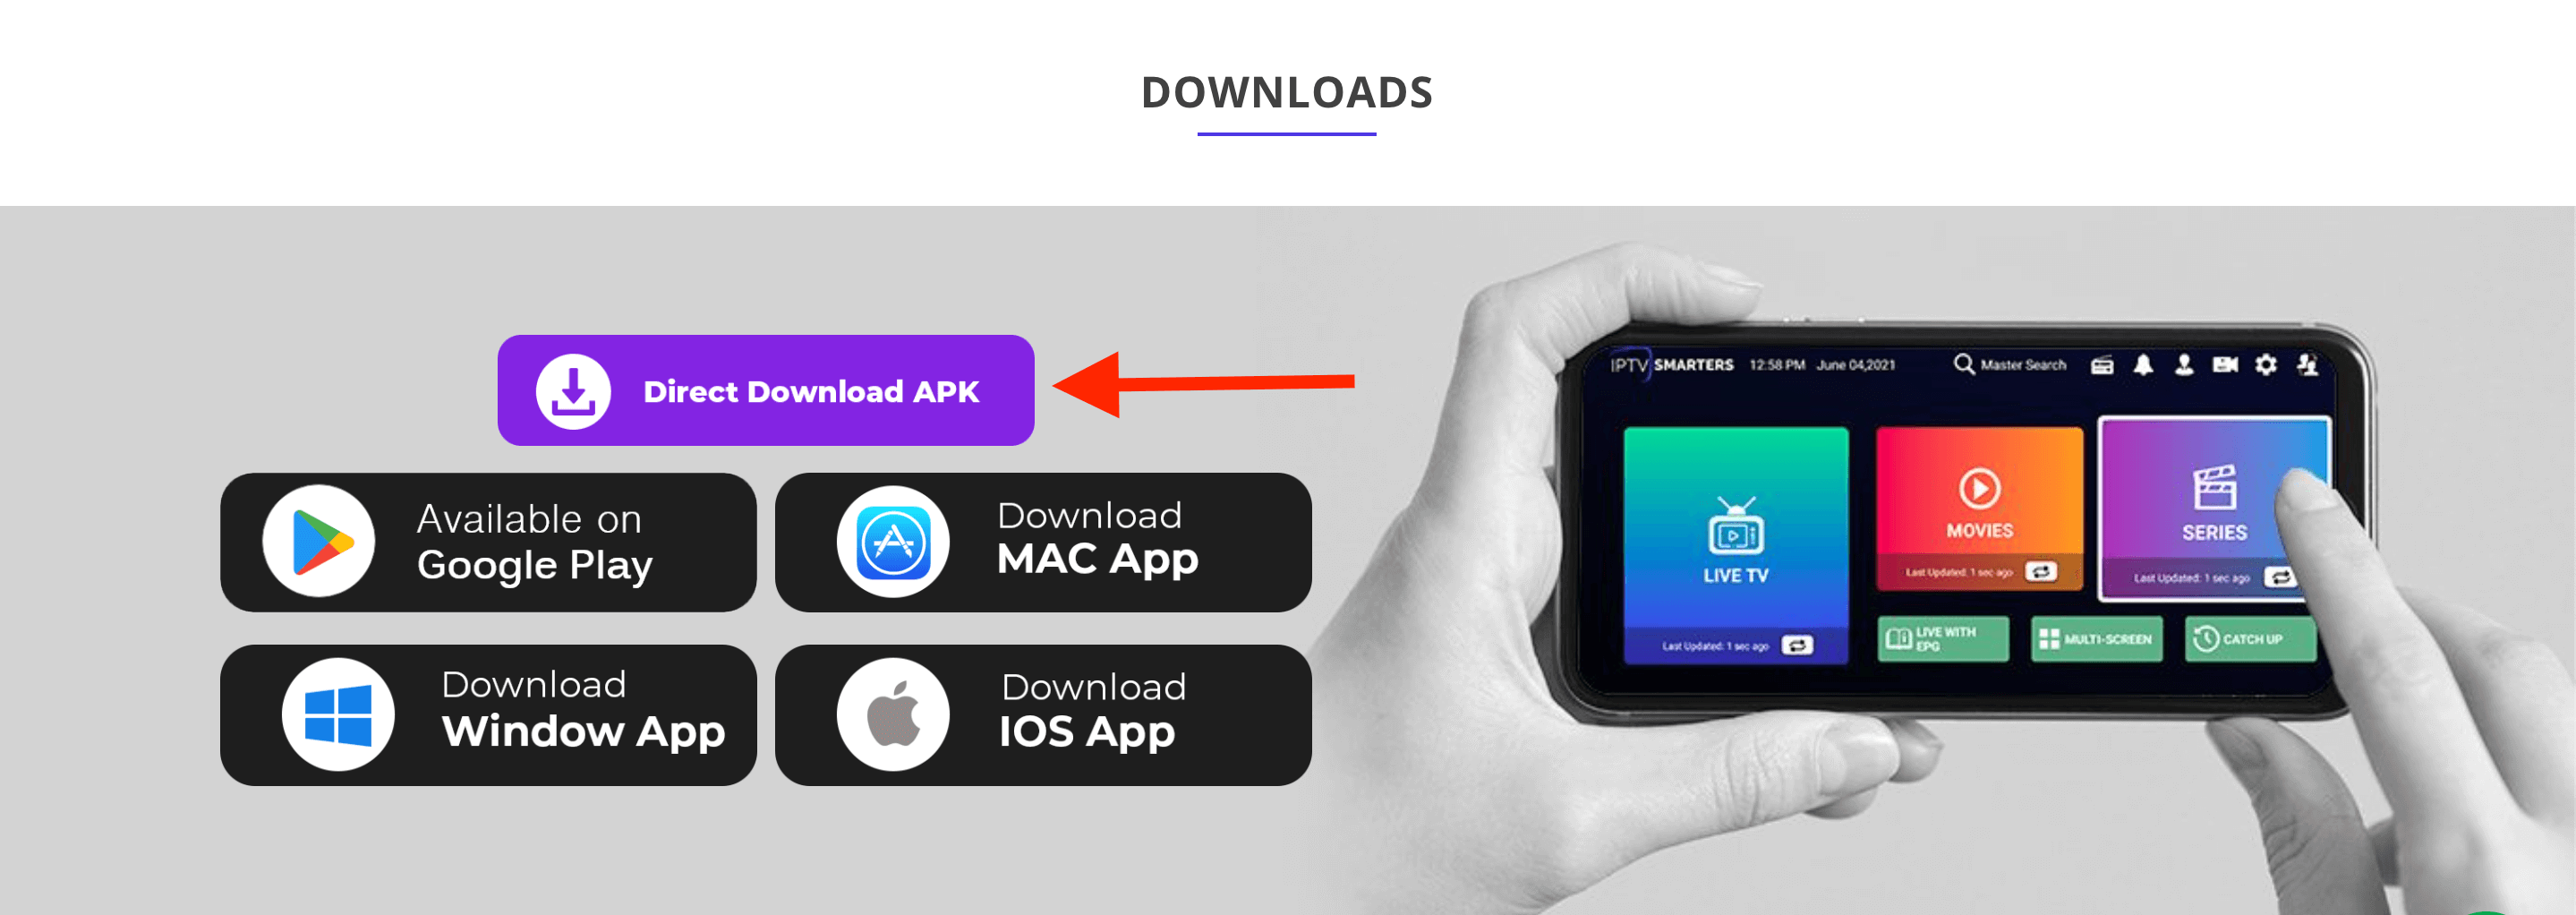
1 First of all your customer needs to install IPTV Smarters App from here: https://iptvsmarters.com/smarters.apk
2 Once the app is downloaded just click on the Install button.
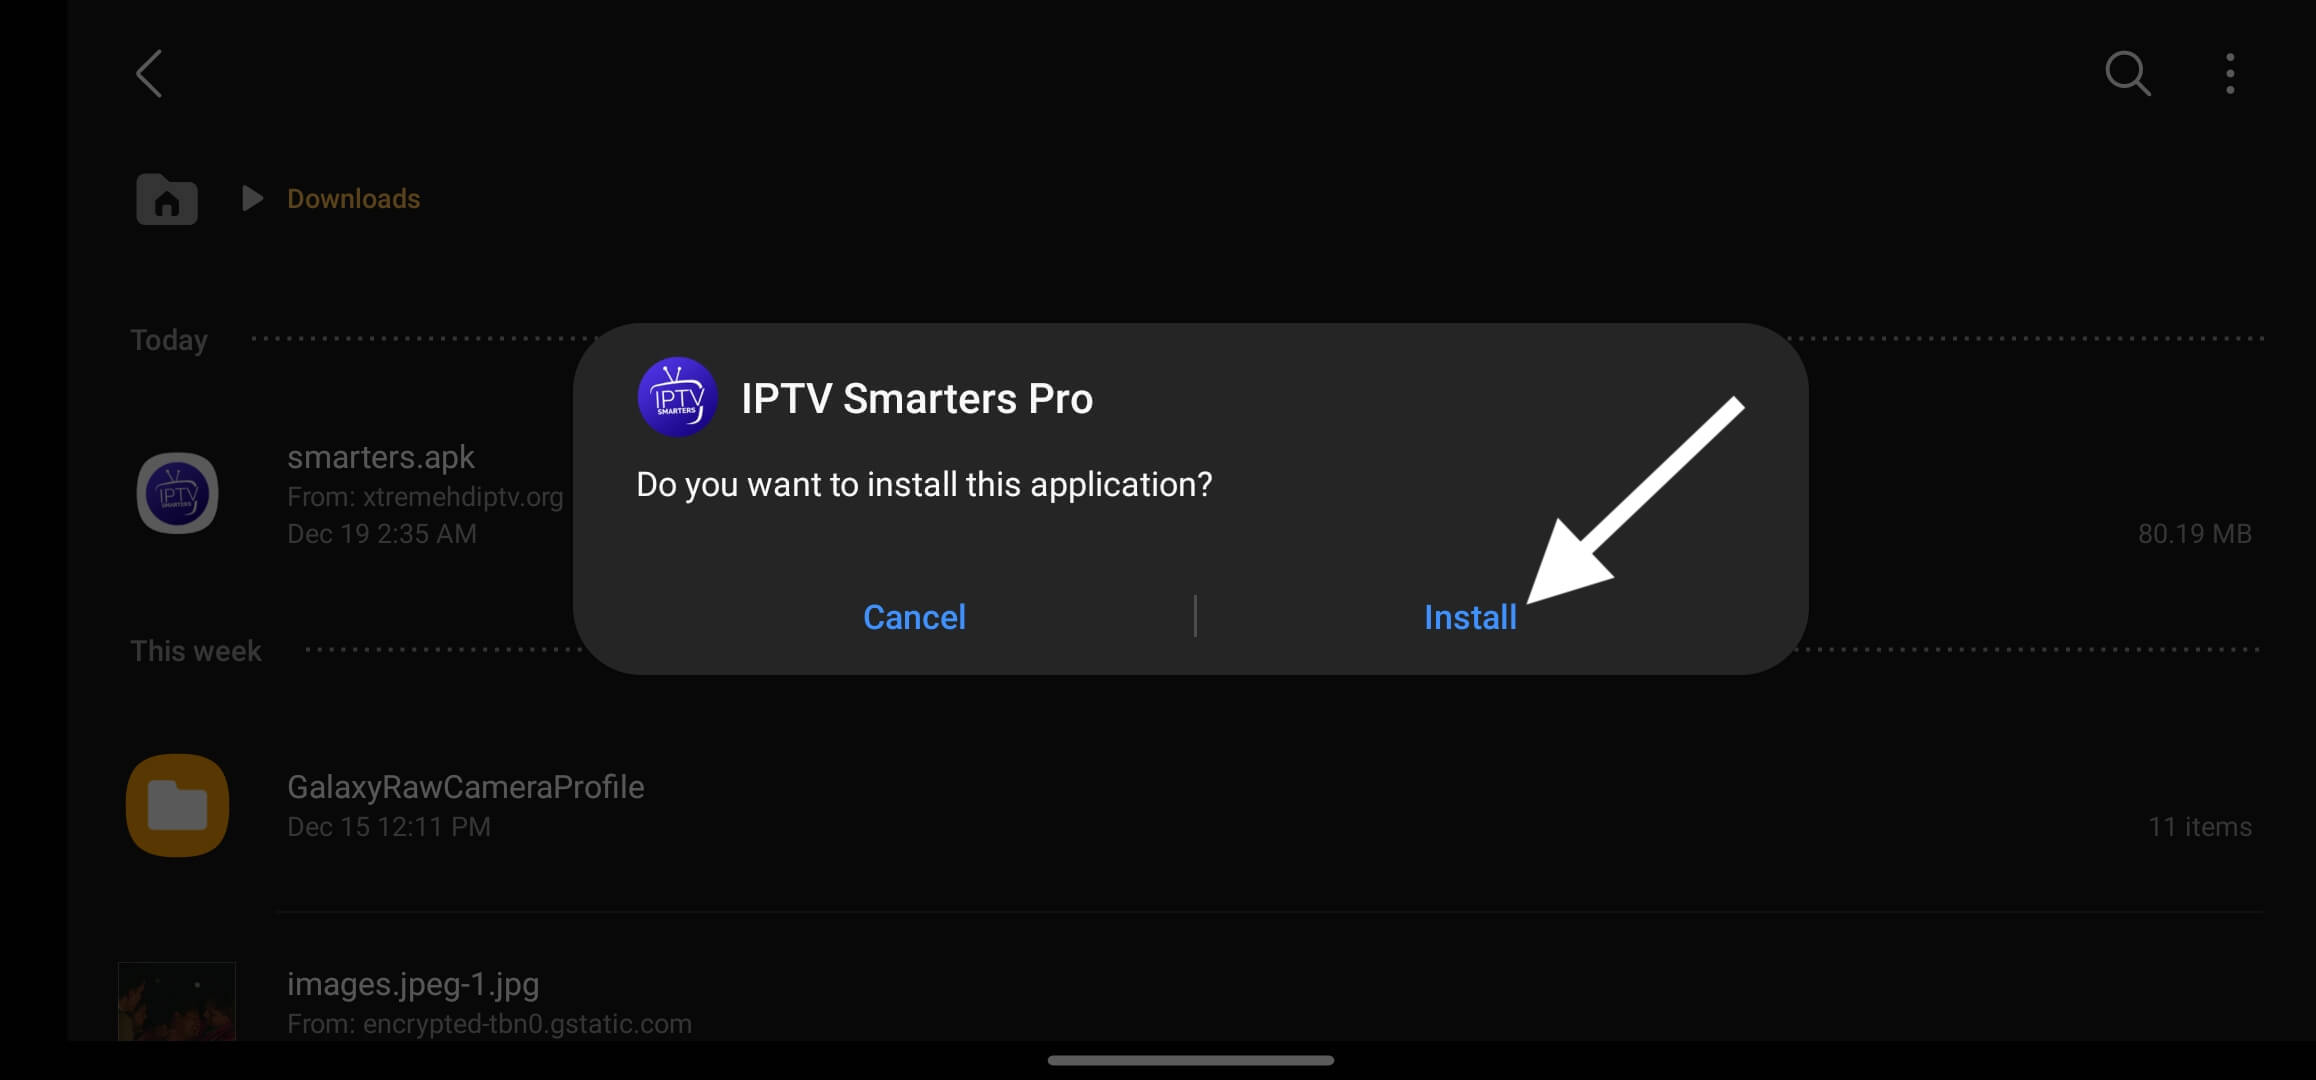
3 After that app will be installed so click on the Open button to launch it.

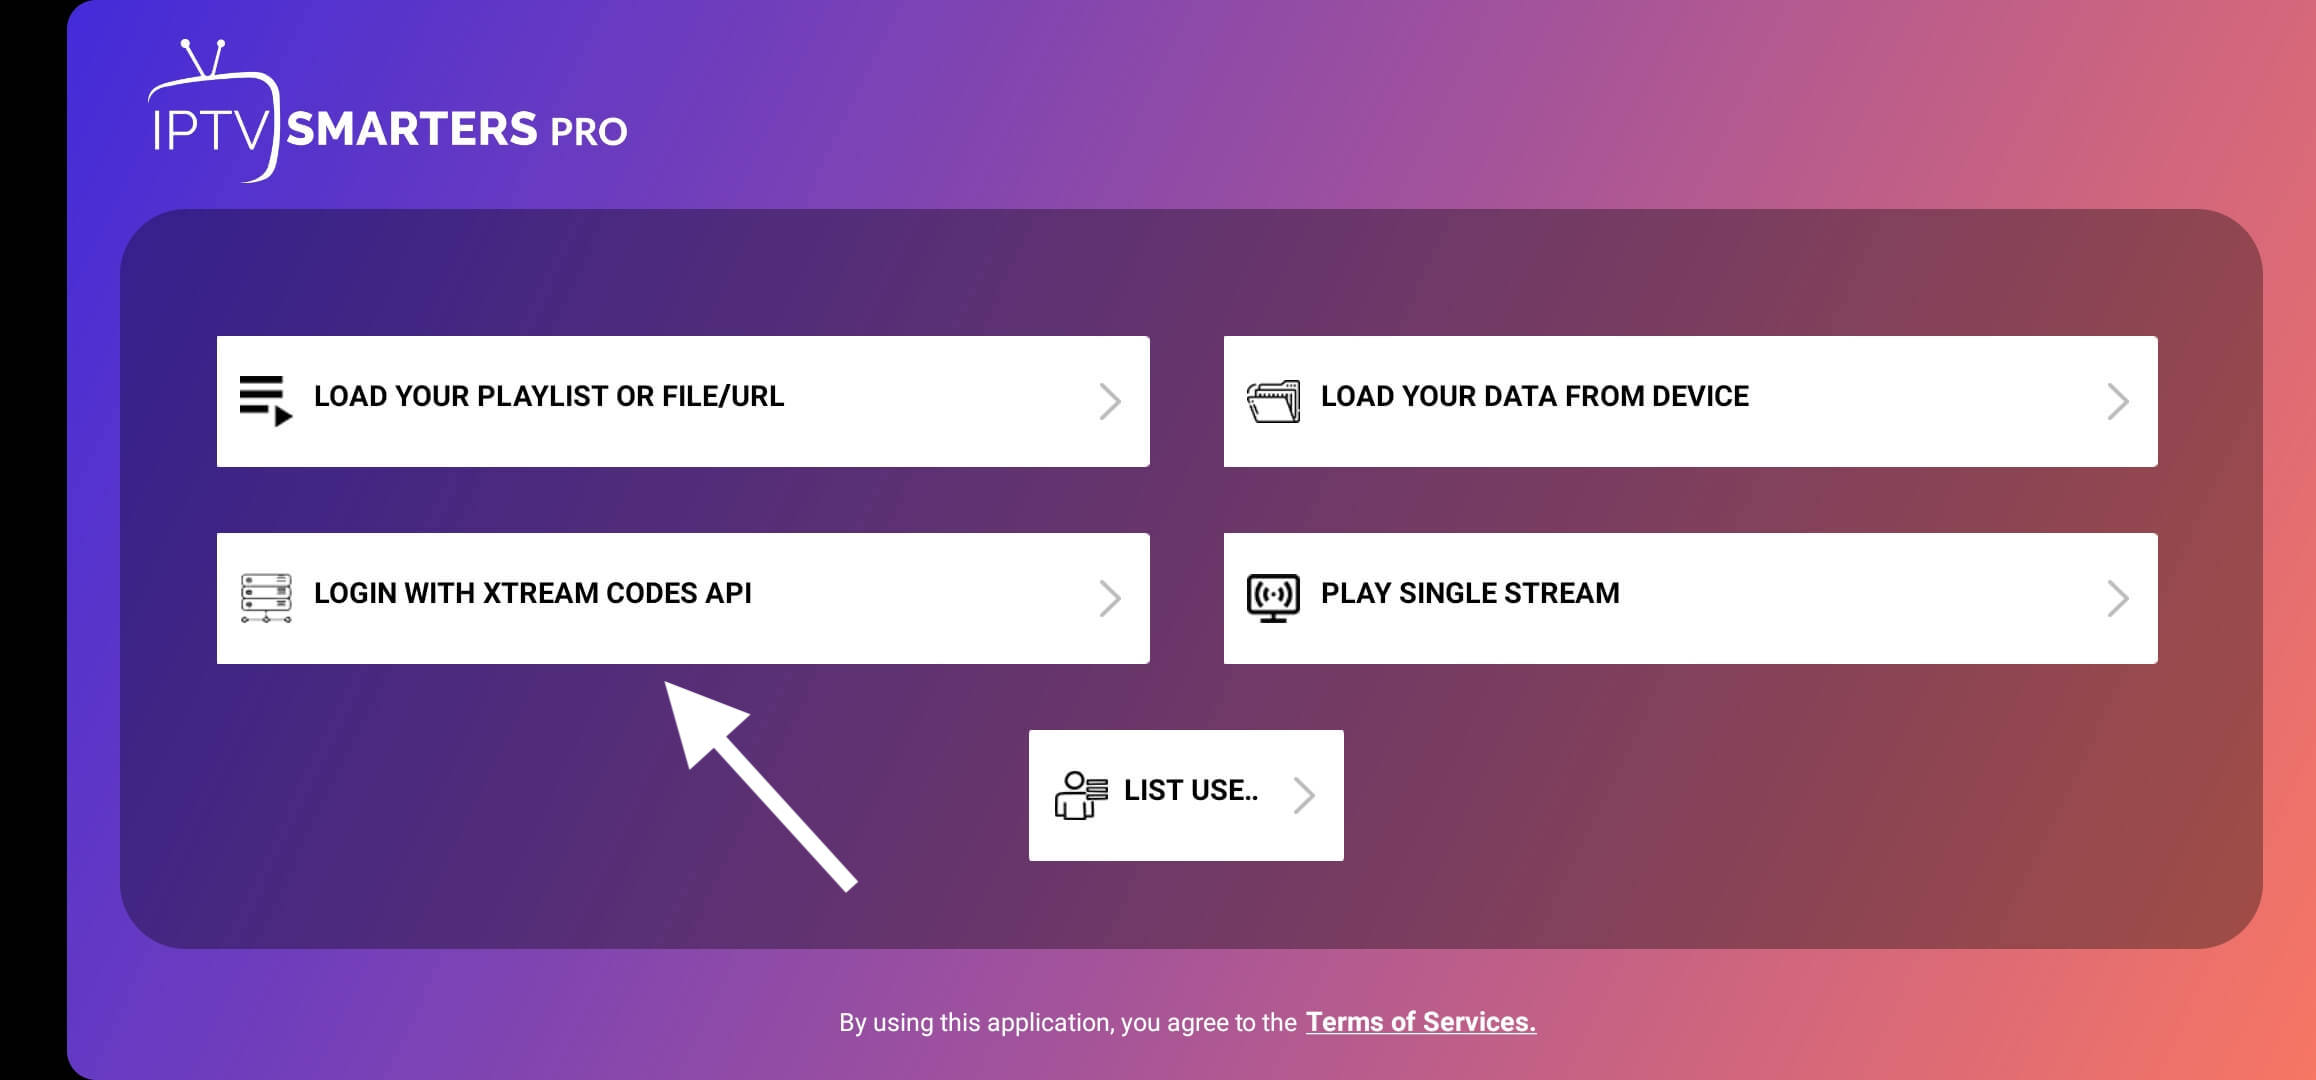
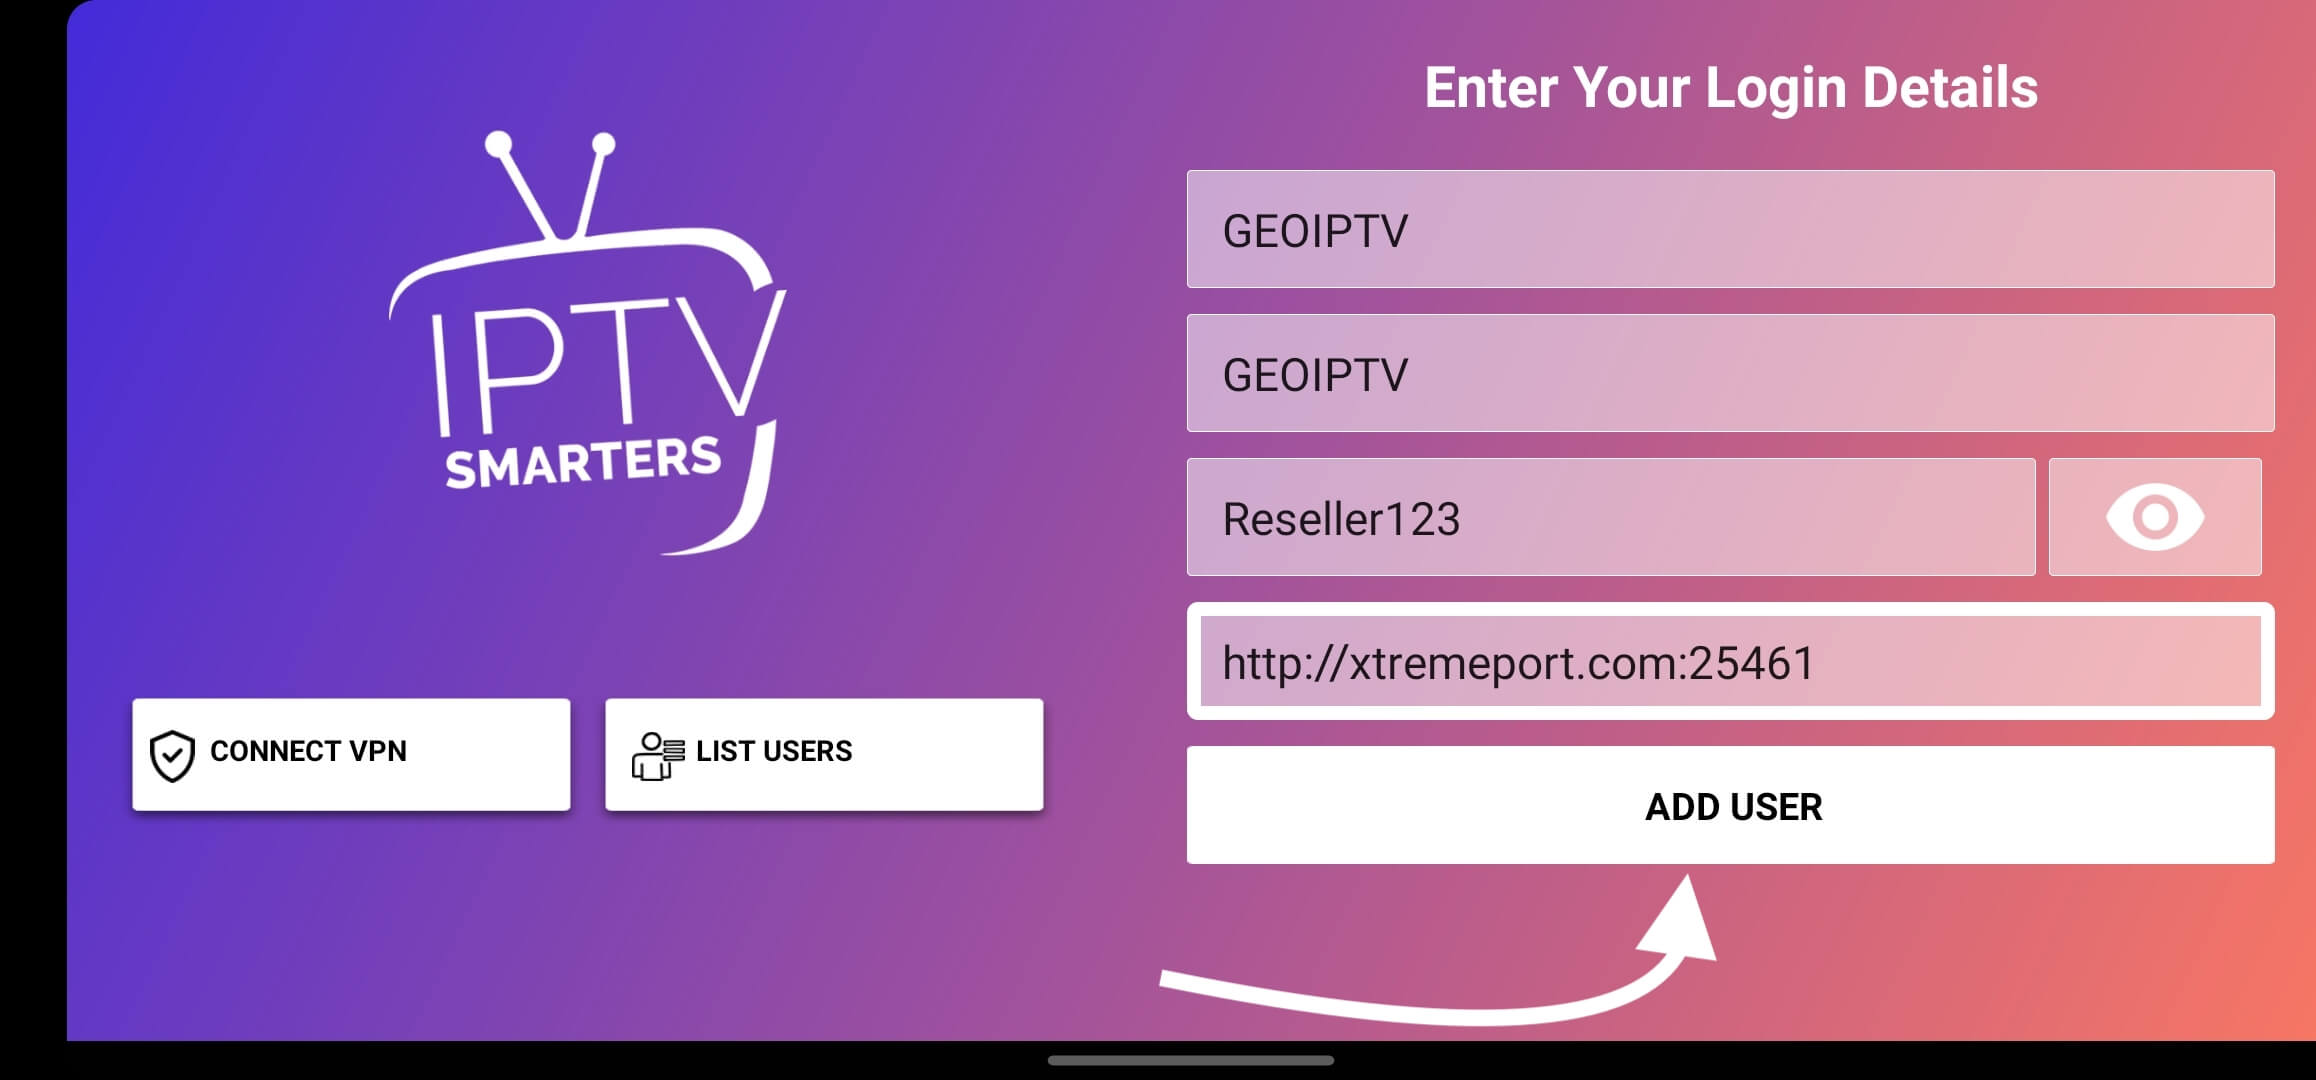
4 When the app is launched it will show various options on the screen, just select log in with Xtream Codes API.
5 From the next screen it will show the login page with multiple boxes, therefore fill these boxes like this:
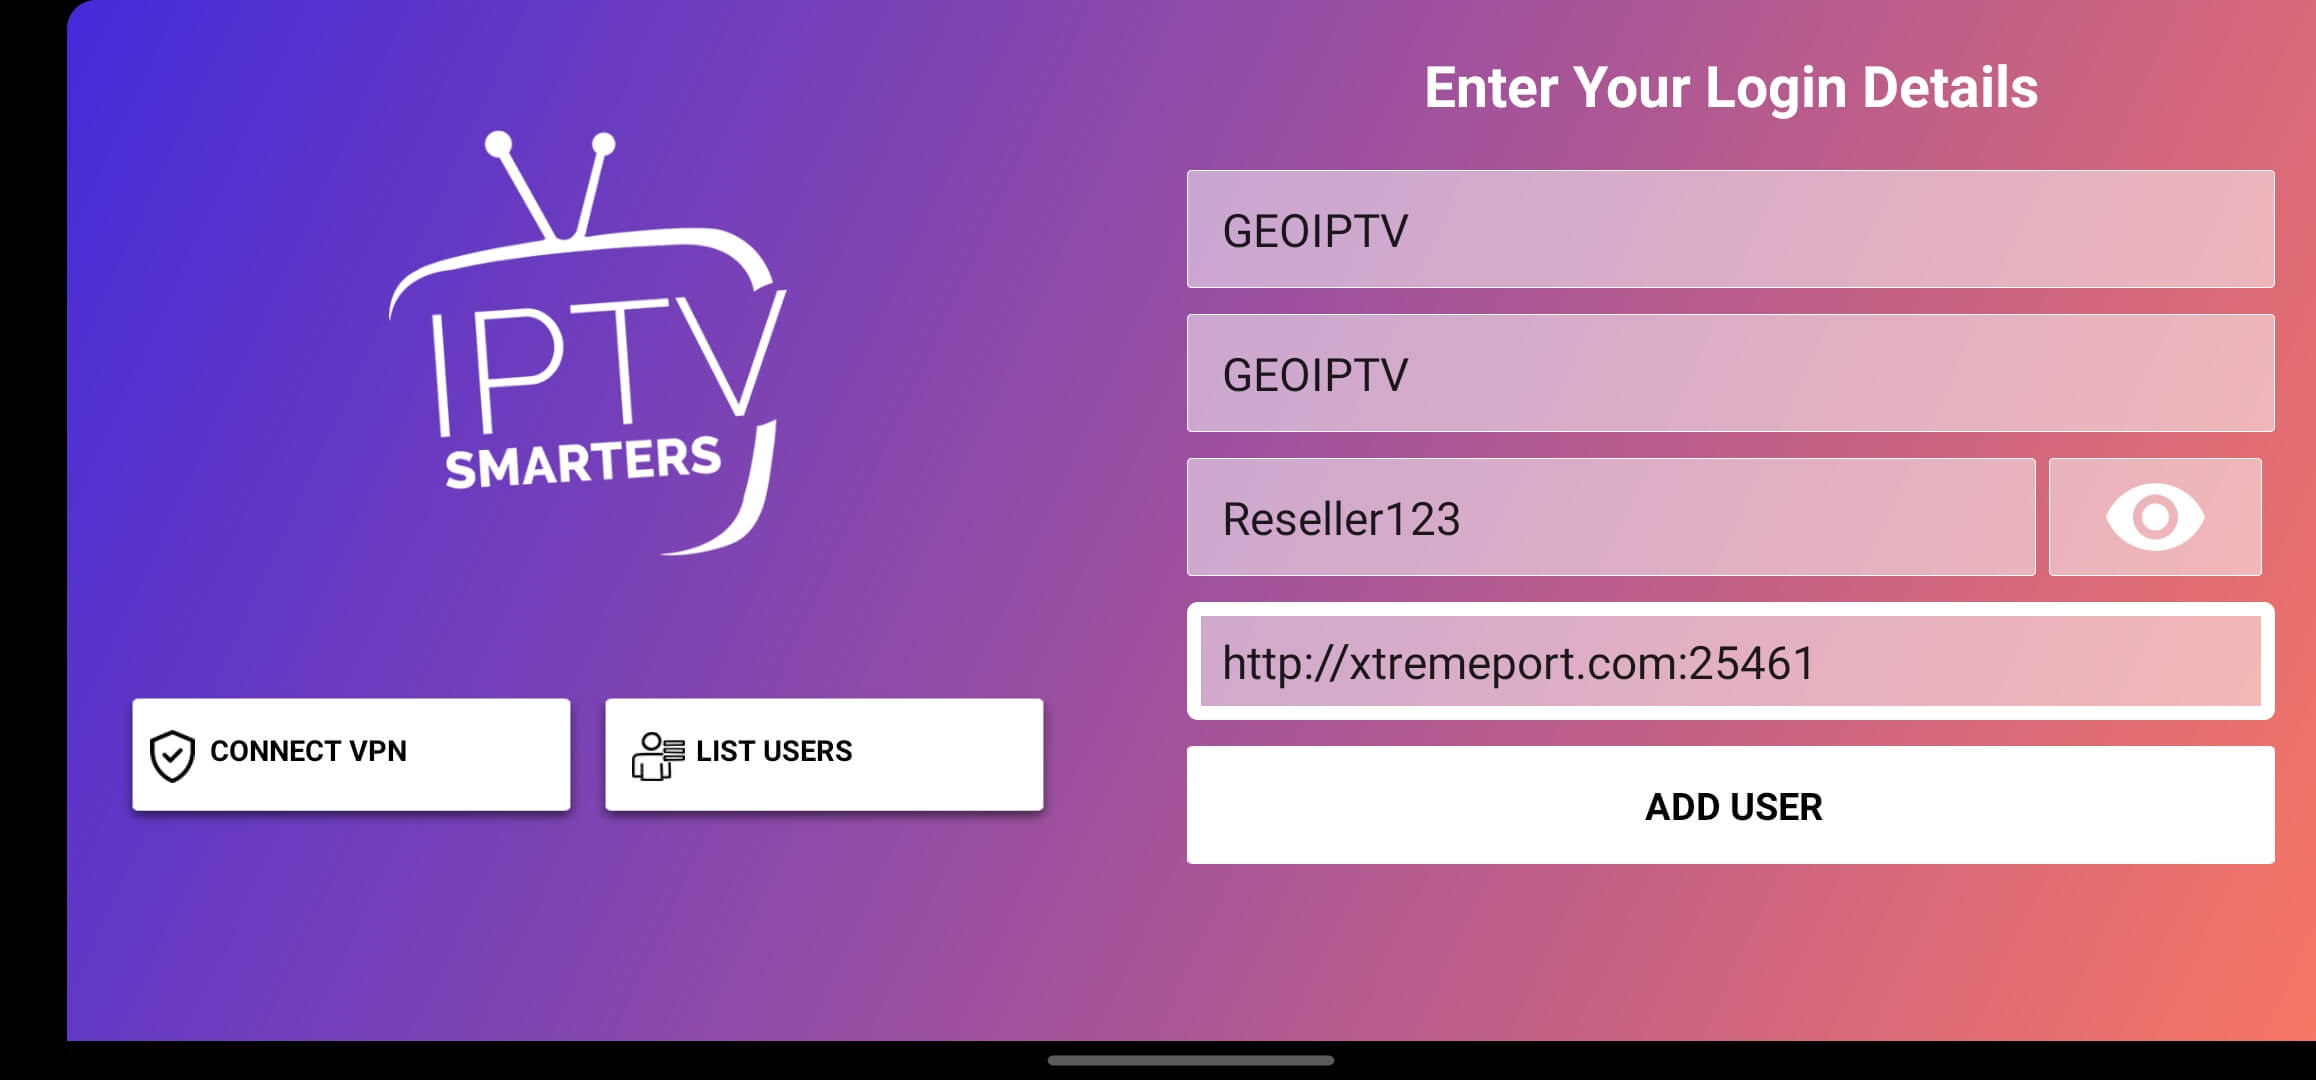
Any Name: Just put your name, TV name or anything you want.
Username: (the one that we provide in an email)
Password: (the one that we provide in an email)
Portal URL: http://xtremeport.com:25461
6 Once all the boxes are filled just click on the Add user and the app will be logged in.
7 After that click on the Live TV and it will start downloading channels from the servers.
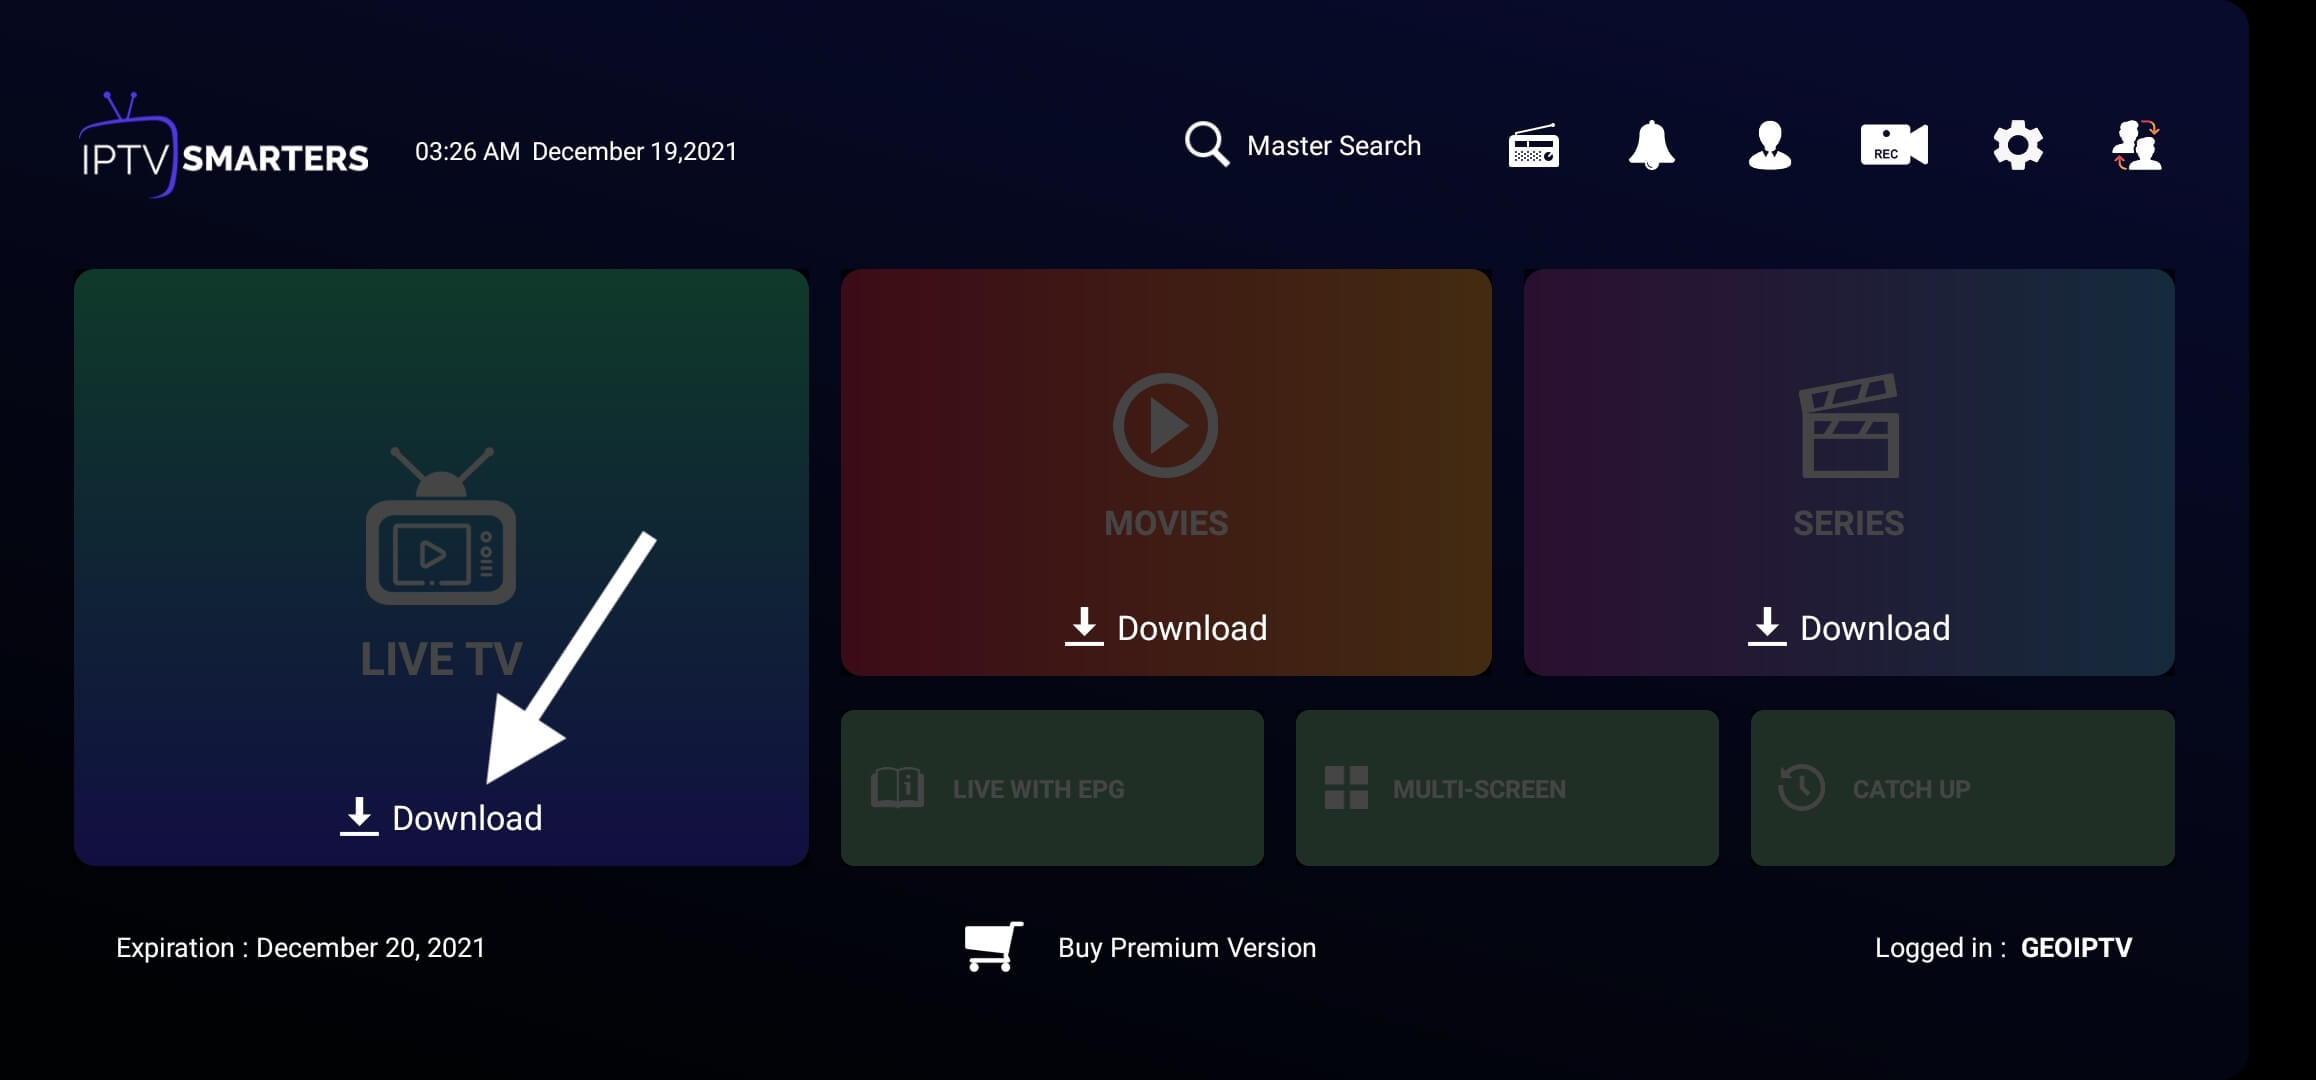
Once everything is downloaded your customer will be able to use the service without any issue.